Installer Customization
Installers created with InstallBuilder can be customized in a variety of ways, including language, size and other aspects which are described in the following sections.
Languages
InstallBuilder supports installations in multiple languages. The following table lists all of the available languages and their codes:
| Supported Languages | |
|---|---|
code |
language name |
sq |
Albanian |
ar |
Arabic |
es_AR |
Argentine Spanish |
az |
Azerbaijani |
eu |
Basque |
pt_BR |
Brazilian Portuguese |
bg |
Bulgarian |
ca |
Catalan |
hr |
Croatian |
cs |
Czech |
da |
Danish |
nl |
Dutch |
en |
English |
et |
Estonian |
fi |
Finnish |
fr |
French |
de |
German |
el |
Greek |
he |
Hebrew |
hu |
Hungarian |
id |
Indonesian |
it |
Italian |
ja |
Japanese |
kk |
Kazakh |
ko |
Korean |
lv |
Latvian |
lt |
Lithuanian |
no |
Norwegian |
fa |
Persian |
pl |
Polish |
pt |
Portuguese |
ro |
Romanian |
ru |
Russian |
sr |
Serbian |
zh_CN |
Simplified Chinese |
sk |
Slovak |
sl |
Slovenian |
es |
Spanish |
sv |
Swedish |
th |
Thai |
zh_TW |
Traditional Chinese |
tr |
Turkish |
tk |
Turkmen |
uk |
Ukrainian |
va |
Valencian |
vi |
Vietnamese |
cy |
Welsh |
|
Note
|
Right to left languages such as Arabic and Hebrew are currently only supported in InstallBuilder for Qt |
By default, the language selection dialog is not displayed but it can be enabled just by modifying the <allowLanguageSelection> tag:
  <project>
     ...
     <allowLanguageSelection>1</allowLanguageSelection>
     ...
  </project>
By default, it will display both the English and the native version of the languages, as displayed in Figure 54. However it can also be configured to show just the English or the native version using the <languageSelectionStyle> project property, which allows: default (for both the English and the native version, Figure 54), onlyNativeNames (for the native representation of the language , Figure 55) and onlyEnglishNames (for just the English name, Figure 56)
  <project>
     ...
     <languageSelectionStyle>default</languageSelectionStyle>
     ...
  </project>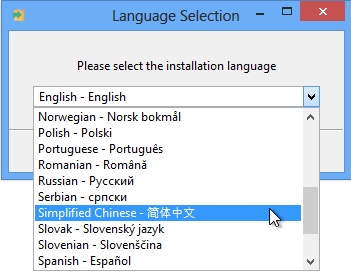
  <project>
     ...
     <languageSelectionStyle>onlyNativeNames</languageSelectionStyle>
     ...
  </project>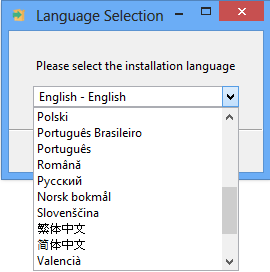
  <project>
     ...
     <languageSelectionStyle>onlyEnglishNames</languageSelectionStyle>
     ...
  </project>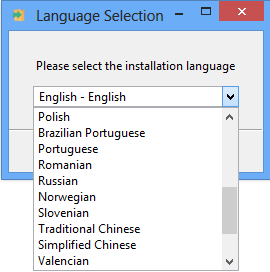
Out of all of the languages supported by InstallBuilder, you can configure which of them will be available in your installer using the <allowedLanguages> tag:
  <project>
     ...
     <allowedLanguages>en es ja</allowedLanguages>
     <defaultLanguage>es</defaultLanguage>
     ...
  </project>
The snippet above also uses the <defaultLanguage> tag to specify the default language to use. When enabling the language selection, this will be the selected item in the dialog and when the language selection is disabled, it will be automatically configured as the installation language.
Take into account that the <defaultLanguage> must be one of the allowed languages or it will be ignored, using the first allowed language instead.
You can also use the installer-language command line flag to overwrite the <defaultLanguage> setting. The allowed values will be those configured in <allowedLanguages>:
$> sample-1.0-linux-installer.run --installer-language jaAutodetecting the System Language
The <defaultLanguage> tag also allows a special code, auto, that will make the installer autodetect the system language and use it as the default language:
  <project>
     ...
     <defaultLanguage>auto</defaultLanguage>
     <allowedLanguages>de en es ja</allowedLanguages>
     ...
  </project>
If the autodetected language does not match any of the allowed languages configured using <allowedLanguages> (in case any was provided), the first language in the list will be used, de in the above example. If the <allowedLanguages> value was not specified or was set to empty, it will be ignored. In the event that the autodetected language is not supported by InstallBuilder, en will be used as the language.
You can also check which language was selected at runtime by accessing the built-in variable ${installation_language_code}.
Changing Built-in Installer Text Strings
InstallBuilder allows customizing most of its built-in language strings using custom language files. These files are basically plain text files with an INI-style format. The keys are language string identifiers that will be shared among all languages (database.title, database.explanation, database.description). The values contain the corresponding text strings for each language (Database Selection, Default database, Which database?). For example, to modify the Welcome Page, you can create a new language file custom-en.lng with the strings to override the default ones:
...
Installer.Welcome.Title=Setup - %1$s
Installer.Welcome.Text=Welcome to the %1$s Setup Wizard.
...
Installer.Welcome.Title=Installation of %1$s
Installer.Welcome.Text=This is the installer of %1$s.
You can then load the new file in your project:
<customLanguageFileList>
   <language>
      <code>en</code>
      <file>path/to/custom-en.lng</file>
   </language>
</customLanguageFileList>
You can download the complete list of tags or request the latest version by writing to us at [email protected]. A copy of the language file is also included in all InstallBuilder installations inside the docs directory:
$> /home/user/installbuilder-25.3.1/docs/userguide/en.lngPlease note that although the original file contains many other strings, you only need to specify those that need to be modified in your language file.
Some of the built-in strings contain special identifiers with names like %1$s. This refers to a value that will be automatically substituted at runtime by the installer (in most cases the full product name). Other common fields inserted in messages are filenames when the string is related to file manipulation actions or error information:
...
Installer.Welcome.Text=This is the installer of %1$s.
...
Installer.Error.Installation.CreatingDirectory=Error creating directory %1$s
...
Installer.Error.PostInstallScript=Error executing post installation script\n%1$s\n\%2$s
...
The internally provided values for the identifiers cannot be modified but if you need to display different settings, you can just use regular InstallBuilder variables. For example, to include the short name and version instead of the full name in the previous string, you could rewrite your translation as:
...
Installer.Welcome.Text=This is the installer of ${project.shortName}-${project.version}.
...
Or mix both:
...
Installer.Welcome.Text=This is the installer of %1$s (${project.shortName}-${project.version}).
...
Where the above string will be resolved as: This is the installer of Sample Installer (sample-1.0).
Adding New Localized Strings
InstallBuilder includes complete language translations for all its built-in messages, but if you customize the installer with new screens or dialogs, you will need to add the strings to your custom language files. You will need to provide a custom language file for each of the languages supported by your installer:
custom-en.lng:
database.title=Database Selection
database.explanation=Default database
database.description=Which database?
custom-es.lng:
database.title=Selección de base de datos
database.explanation=Base de datos por defecto
database.description=Qué base de datos?
Once you have created a language file for each of your supported languages, you will need to load them from your XML project:
  <project>
     ...
     <customLanguageFileList>
       <language>
         <code>en</code>
         <encoding>iso8859-1</encoding>
         <file>path/to/custom-en.lng</file>
       </language>
       <language>
         <code>de</code>
         <encoding>iso8859-1</encoding>
         <file>path/to/custom-de.lng</file>
       </language>
       <language>
         <code>fr</code>
         <encoding>iso8859-1</encoding>
         <file>path/to/custom-fr.lng</file>
       </language>
     </customLanguageFileList>
     ...
  </project>
Please note that the language files are mapped to the desired language using the <code>. It is also very important to configure the <encoding> accordingly to your language files or you could end up with an unreadable translation.
Those language files will then be included in the installer at build time and the translated strings will be available at runtime using the ${msg()} notation. The following example shows how the strings above can be used to localize a choice parameter:
<choiceParameter>
   <ask>1</ask>
   <default>oracle</default>
   <description>${msg(database.description)}</description>
   <explanation>${msg(database.explanation)}</explanation>
   <title>${msg(database.title)}</title>
   <name>database</name>
   <optionList>
     <option>
       <value>oracle</value>
       <text>Oracle</text>
     </option>
     <option>
       <value>mysql</value>
       <text>Mysql</text>
     </option>
   </optionList>
</choiceParameter>
Component-Level Translations
Components can also provide their own <customLanguageFileList>. The component-level language files will be processed after the main one (project level) and the keys there will overwrite the project-level ones. This feature allows you to share translations among multiple projects.
When a specific language is needed for a particular installer, you can add a translation component that will take care of redefining some of the language strings:
  <project>
     ...
     <customLanguageFileList>
       <language>
         <code>en</code>
         <encoding>iso8859-1</encoding>
         <file>path/to/custom-en.lng</file>
       </language>
     </customLanguageFileList>
     ...
     <componentList>
       <component>
          <name>translations</name>
          <show>0</show>
          <customLanguageFileList>
            <language>
              <code>en</code>
              <encoding>iso8859-1</encoding>
             <file>path/to/alternative-custom-en.lng</file>
            </language>
          </customLanguageFileList>
       </component>
     </componentList>
     ...
  </project>
Displaying a Localized License and Readme
You can specify multiple localized versions for your <licenseFile> using the <licenseFileList> tag. Take into account that you still need to provide a value for the <licenseFile> tag to make the installer show the license page. This <licenseFile> will be also used as the default license file in case there’s no localized license file for the current language.
Inside this tag, you can add as many <licenseFile> elements as localized licenses you provide. For each <licenseFile> element, you’ll need to provide the license file path, its language identifier and the file encoding.
Here’s an example of how it works:
<licenseFileList>
   <licenseFile>
     <code>en</code>
     <file>/home/user/license-english.txt</file>
     <encoding>iso8859-1</encoding>
   </licenseFile>
   <licenseFile>
     <code>ja</code>
     <file>/home/user/license-japanese.txt</file>
     <encoding>utf-8</encoding>
   </licenseFile>
</licenseFileList>
The installer will pick the right license file depending on the current selected language for the installer.
If you need to display more than one license page, or simply to make them display conditionally, you can use a <licenseParameter>:
<licenseParameter>
    <name>myLicense</name>
    <title>License Agreement</title>
    <description>Please read the following License Agreement. You must accept
    the terms of this agreement before continuing with the installation.</description>
    <explanation></explanation>
    <file>some/default/license.txt</file>
    <htmlFile>some/default/license.html</htmlFile>
    <licenseFileList>
      <licenseFile>
        <code>en</code>
        <file>/home/user/license-english.txt</file>
        <htmlFile>/home/user/license-english.html</htmlFile>
        <encoding>iso8859-1</encoding>
      </licenseFile>
      <licenseFile>
        <code>ja</code>
        <htmlFile>/home/user/license-japanese.html</htmlFile>
        <file>/home/user/license-japanese.txt</file>
        <encoding>utf-8</encoding>
      </licenseFile>
    </licenseFileList>
</licenseParameter>
You can do a similar arrangement with readme files and the <readmeFileList> tag:
<readmeFileList>
  <readmeFile>
    <code>en</code>
    <file>/home/user/readme-english.txt</file>
    <encoding>iso8859-1</encoding>
  </readmeFile>
  <readmeFile>
    <code>ja</code>
    <file>/home/user/readme-japanese.txt</file>
    <encoding>utf-8</encoding>
  </readmeFile>
</readmeFileList>
Providing a main <readmeFile> at the <project> level is required to enable the readme file. This <readmeFile> will be used as the default readme file in case there’s no localized readme file for the current language.
|
Note
|
Even if the installer provides a project level The |
|
Note
|
HTML license and readme files in Qt mode
Both the main license file (using the Although the |
Images
InstallBuilder provide default images for all the generated installers but you can also configure them. All images need to be provided in PNG format except for:
-
Windows installer and uninstaller icons (which must be provided in ICO format)
-
OS X installer and uninstaller icons (which must be provided in ICNS format)
Splash Screen
It is possible to configure the splash screen image and the time while it will be displayed:
<project>
   ...
   <splashImage>path/to/mySplash.png</splashImage>
   <!-- Additional delay in milliseconds -->
   <splashScreenDelay>3000</splashScreenDelay>
   ...
</project>
The splash image will be displayed for an additional 3 seconds (in addition to the built-in delay of 1 second).
The splash screen can be also disabled using the <disableSplashScreen> setting:
<project>
   ...
   <disableSplashScreen>1</disableSplashScreen>
   ...
</project>
Left and Top Images
It is possible to configure the images that will appear on the left side and the top right corner of the wizard UI, as shown below:
<project>
   ...
   <style>standard</style>
   <logoImage>path/to/topImage.png</logoImage>
   <leftImage>path/to/leftImage.png</leftImage>
   ...
</project>
The layout of the installer pages and when the left and top images are displayed depends on the <style> configured in the project.
InstallBuilder supports two display styles:
-
Standard Style:
In the standard style, the left image is displayed in the welcome and the final page and the top image is displayed in all the parameter pages and the readytoinstall page. The installation page will also display the top image if no slideshow images were configured or the slideshow if they were.
<project>
   ...
   <style>standard</style>
   ...
</project>-
Custom Style:
When using the custom style, no top right image is displayed and all of the pages will show the left image. Parameter pages can configure the left image displayed through their <leftImage> property:
<project>
   ...
   <style>custom</style>
   ...
   <parameterList>
      <directoryParameter>
         <name>installdir</name>
         <description>Installer.Parameter.installdir.description</description>
         ...
         <leftImage>path/to/installdir_image.png</leftImage>
         ...
      </directoryParameter>
   </parameterList>
   ...
</project>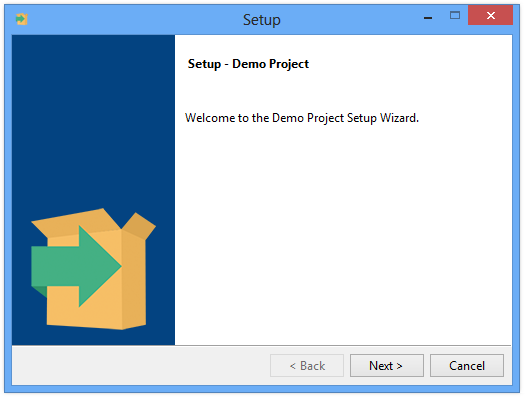
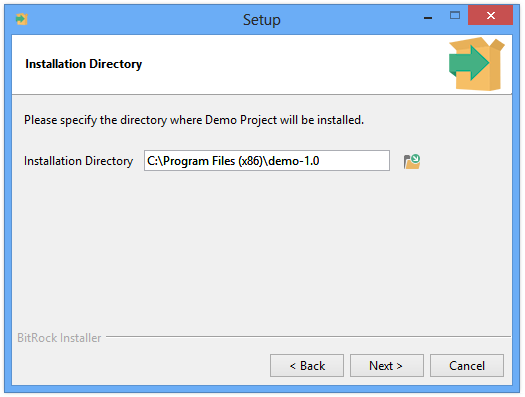
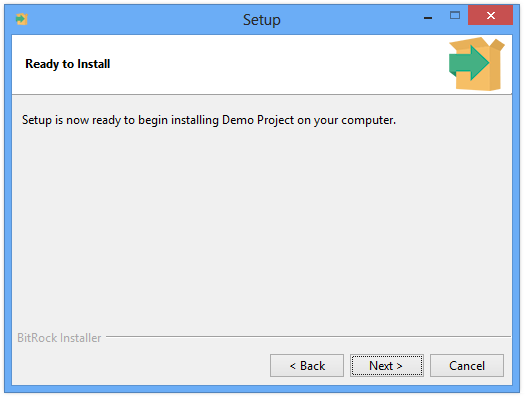
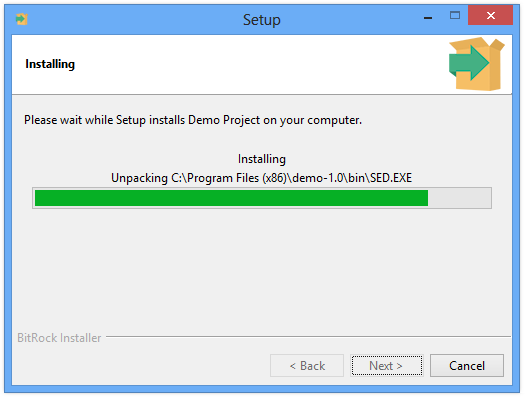
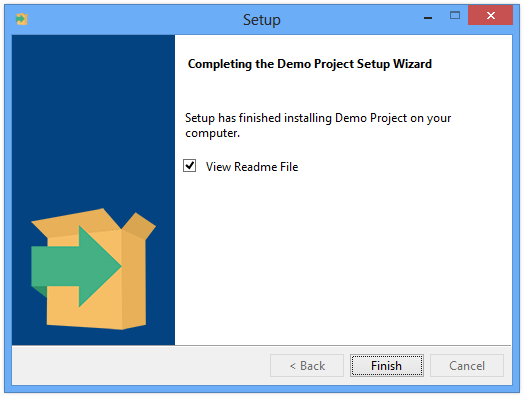
The installation page will also display the project level left image if no slideshow images were configured or the slideshow if they were.
<project>
   ...
   <style>custom</style>
   ...
</project>
Windows specific images
Windows Icons
Windows icons are also customizable for both the installer and the uninstaller. InstallBuilder expects an ICO file containing the below images:
-
64 x 64 pixels, 32bpp (16.7 million Colors)
-
48 x 48 pixels, 32bpp (16.7 million Colors)
-
32 x 32 pixels, 32bpp (16.7 million Colors)
-
24 x 24 pixels, 32bpp (16.7 million Colors)
-
16 x 16 pixels, 32bpp (16.7 million Colors)
-
48 x 48 pixels, 8bpp (256 Colors)
-
32 x 32 pixels, 8bpp (256 Colors)
-
16 x 16 pixels, 8bpp (256 Colors)
Although some of them can be skipped, you must at least provide the following sizes:
-
48 x 48 pixels, 32bpp (16.7 million Colors) or 8bpp (256 Colors)
-
32 x 32 pixels, 32bpp (16.7 million Colors) or 8bpp (256 Colors)
-
16 x 16 pixels, 32bpp (16.7 million Colors) or 8bpp (256 Colors)
If your icon file contains any additional images (such as a 256x256 image), they will just be ignored.
Those icons must then be configured in your project:
<project>
   ...
   <windowsExecutableIcon>path/to/installer.ico</windowsExecutableIcon>
   <windowsUninstallerExecutableIcon>path/to/uninstaller.ico</windowsUninstallerExecutableIcon>
   ...
</project>
If the uninstaller icon is not configured explicitly, the installer icon will be used instead. Similarly, if no installer icon is specified, the default InstallBuilder icon will be used.
The locations specified in the <windowsExecutableIcon> and <windowsUninstallerExecutableIcon> refer to files in the build machine.
Other Windows images
Apart from the installer and uninstaller icons, you can also provide images for other settings:
-
Add/Remove Programs Menu Icon: This icon is configured through the
<productDisplayIcon>tag and will be displayed in the ARP menu in addition to your application details. The icon is configured at runtime so the provided location must point to a file in the target machine, in most of the cases, installed by your application:
<project>
   ...
   <!-- Path in the target machine -->
   <productDisplayIcon>${installdir}/icons/arp.ico</productDisplayIcon>
   ...
   <componentList>
     <component>
        <name>windowsComponent</name>
        <folderList>
          <folder>
            <name>icons</name>
             <destination>${installdir}</destination>
               <distributionFileList>
                  <!-- Directory containing arp.ico icon -->
                  <distributionDirectory origin="/path/to/icons"/>
               </distributionFileList>
          </folder>
        </folderList>
     </component>
   </componentList>
</project>-
Shortcuts icons: When creating shortcuts to executables on Windows, the icon of the application will be used. If the shortcut points to a different file-type such as a
.txtor.batfile, the icon of the associated program will be displayed. Of course, you can also provide your own custom icon:
 <createShortcuts>
    <destination>${windows_folder_startmenu}/${project.fullName}</destination>
    <shortcutList>
      <shortcut>
        <comment>Launches ${project.fullName}</comment>
        <name>Launch ${project.fullName}</name>
        <windowsIcon>${installdir}/icons/custom.ico</windowsIcon>
        <windowsExec>${installdir}/myApp.exe</windowsExec>
      </shortcut>
    </shortcutList>
  </createShortcuts>
The <windowsIcon> tag can also point to an executable. In that case, the icon of the referenced binary will be used. For example, to configure you .bat files to look like a cmd prompt:
 <createShortcuts>
    <destination>${windows_folder_startmenu}/${project.fullName}</destination>
    <shortcutList>
      <shortcut>
        <comment>Launches ${project.fullName}</comment>
        <name>Launch ${project.fullName}</name>
        <windowsIcon>%SystemRoot%\system32\cmd.exe</windowsIcon>
        <windowsExec>${installdir}/script/wrapped-shell.bat</windowsExec>
      </shortcut>
    </shortcutList>
  </createShortcuts>
OS X Icons
Similarly to Windows, OS X installer and uninstaller application bundles can also include custom icons, provided using the <osxApplicationBundleIcon> and <osxUninstallerApplicationBundleIcon> project properties:
<project>
   ...
   <osxApplicationBundleIcon>path/to/Bundle.icns</osxApplicationBundleIcon>
   <osxUninstallerApplicationBundleIcon>path/to/UninstallerBundle.icns</osxUninstallerApplicationBundleIcon>
   ...
</project>
InstallBuilder will check if the provided icons are valid .icns files and will throw an error if the check fails. In addition, you must take into account the required icons in your .icns file as described in the https://developer.apple.com/library/mac/documentation/UserExperience/Conceptual/AppleHIGuidelines/XHIGIcons/XHIGIcons.html//apple_ref/doc/uid/20000967-TPXREF102[Apple guidelines]. At a minimum, the icon bundle must contain the following sizes:
-
512 x 512 pixels (For finder icons in OS X 10.5 and later)
-
128 x 128 pixels
-
32 x 32 pixels
-
16 x 16 pixels
Other images
Window Manager Image
The <wmImage> tag expects a 48x48 GIF or PNG logo image that will be shown in the window manager task bar. On Windows and OS X, when running in Qt mode, it will also be used as the window icon (displayed in the window title bar). On Windows, in modes other than Qt, the window icon will be obtained from the 16pixel image included in the executable.
If a <wmImage> is not provided, a default image is displayed.
  <project>
    ...
    <wmImage>path/in/the/build/machine/logo.png</wmImage>
    ...
  </project>
Slide Show Images
InstallBuilder allows displaying a slide show while the files are being copied. This is really useful to show your application features or promote other products or services from your company. Each slide is represented by a 500x222 GIF or PNG image configured using a <slideShowImage> element:
  <project>
    ...
    <slideShowImageList>
       <slideShowImage>
          <path>path/to/image1.png</path>
       </slideShowImage>
       <slideShowImage>
          <path>path/to/image2.png</path>
       </slideShowImage>
       <slideShowImage>
          <path>path/to/image3.png</path>
       </slideShowImage>
    </slideShowImageList>
    ...
  </project>
Where the paths to the images correspond to where they are located at build time.
The behavior of the slide show can be configured to continuously loop during the installation (through the <slideShowLoop> tag) or not. The number of seconds that each image will be displayed can be also defined (specified in the <slideShowTiming> tag). For example, if you want to display 5 slides without repeating them with 10 seconds for each of them, you can use:
  <project>
    ...
    <slideShowLoop>0</slideShowLoop>
    <slideShowTiming>10</slideShowTiming>
    <slideShowImageList>
       <slideShowImage>
          <path>path/to/feature1.png</path>
       </slideShowImage>
       <slideShowImage>
          <path>path/to/feature2.png</path>
       </slideShowImage>
       <slideShowImage>
          <path>path/to/feature3.png</path>
       </slideShowImage>
       <slideShowImage>
          <path>path/to/feature4.png</path>
       </slideShowImage>
       <slideShowImage>
          <path>path/to/feature5.png</path>
       </slideShowImage>
    </slideShowImageList>
    ...
  </project>
Label Parameter Images
It is also possible to display images in custom parameter pages using a <labelParameter>, which allows providing an image in its <image> tag:
<parameterGroup>
    <name>autoupdate</name>
    <title>AutoUpdate</title>
    <orientation>horizontal</orientation>
    <parameterList>
        <labelParameter>
            <name>autoUpdateImage</name>
            <image>/path/to/autoupdate.png</image>
        </labelParameter>
        <booleanParameter>
            <name>includeAutoUpdate</name>
            <description>Install AutoUpdate</description>
            <default>1</default>
            <displayStyle>radiobuttons</displayStyle>
        </booleanParameter>
    </parameterList>
</parameterGroup>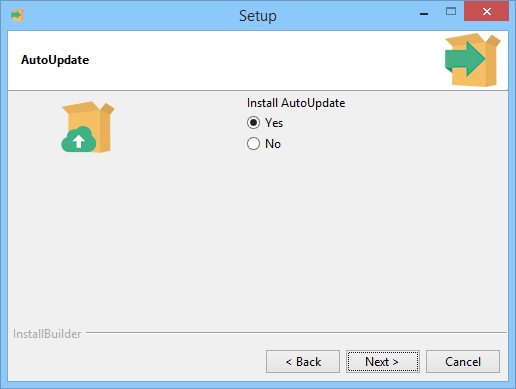
Option Images
It is also possible to add images to the <option> elements used in a <choiceParameter>:
<choiceParameter>
   <name>dbmsserver</name>
   <description>DBMS</description>
   <explanation>Database server</explanation>
   <allowEmptyValue>1</allowEmptyValue>
   <displayType>combobox</displayType>
   <optionList>
     <option>
       <description>MySQL server</description>
       <text>MySQL</text>
       <value>mysql</value>
       <image>${build_project_directory}/img/mysql-logo.png</image>
     </option>
     <option>
       <description>PostgreSQL server</description>
       <text>PostgreSQL</text>
       <value>postgres</value>
       <image>${build_project_directory}/img/postgresql-logo.png</image>
     </option>
   </optionList>
</choiceParameter>
Recommended Image Sizes
Although InstallBuilder will try to accommodate the layout of the pages to any image size, there are recommended sizes for some of them. The table below summarizes those sizes:
| Image | Width | Height |
|---|---|---|
Left panel image ( |
163 pixels |
314 pixels |
Top right image ( |
48 pixels |
48 pixels |
SlideShow image ( |
500 pixels |
222 pixels |
Splash screen ( |
300-350 pixels |
100-150 pixels |