User Interface
Installation Modes
This sections covers the different installation modes that a InstallBuilder Installer can run in and how they can be selected both at runtime and build time.
Full Graphic Modes
These modes allow full interactivity through a point-and-click GUI interface. Depending on the version of InstallBuilder and the platform of execution, the allowed modes can be:
-
Gtk mode (
gtk): Regular IB default execution mode on Linux, and Linux x64. The installer presents a Gtk look and feel. It requires the Gtk libraries to be present in the system. -
X-Window mode (
xwindow): Lightweight graphic execution mode on Linux / Unix systems. -
OS X mode (
osx): Regular IB default execution mode on OS X systems. Provides the native OS X application look and feel. -
Windows mode (
win32): Regular IB execution mode on Windows. Provides native Windows application look and feel -
Qt mode (
qt): InstallBuilder for Qt bundles an additionalqtmode which uses a common graphic library for all platforms. The look and feel on Linux is Qt and it has a native look and feel on OS X and Windows. This mode allow extended text formatting among other tweaks in the installers.
All modes are functionally equivalent and which one to use is mostly a matter of personal preference. For example, a Qt application developer may want to distribute their application with the InstallBuilder for Qt version.
Text Mode:
This mode provides full interactivity with users in the command line. It is equivalent to any GUI mode but the pages are displayed in text mode in a console. This installation mode is not available on Windows because GUI applications are not attached to a console and the text would not be visible.
This mode is especially convenient when no X-Window server is detected. In these cases, this mode is automatically selected by default if no other valid mode is forced (such as unattended).
Unattended mode:
This execution mode is especially useful for automating the installation processes. It can be configured to present different levels of user interaction through the
--unattendedmodeui command line flag or the <unattendedModeUI> project property. The allowed values are:
-
none: No user interaction is required and no output shown. This is the default if no unattended mode UI option is provided. -
minimal: No user interaction is required and a progress pop-up is displayed showing the installation progress.
$> .\installbuilder-professional-26.2.0-windows-installer.exe --mode unattended --unattendedmodeui minimal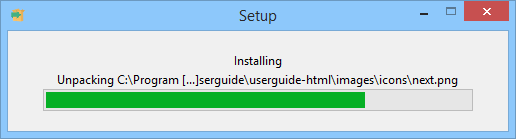
-
minimalWithDialogs: In addition to the installation progress shown in the minimal mode, pop-ups are also displayed. This mode may require some user interaction, depending on the specific installer logic.
$> .\sample-1.0-windows-installer.exe --mode unattended --unattendedmodeui minimalWithDialogs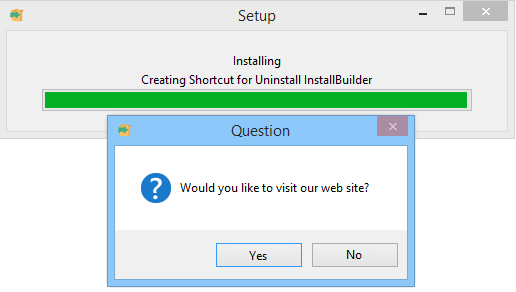
Selecting the Execution Mode
The execution mode can be configured using command line flags or setting it in the XML project. Using the command line is as easy as typing in a console:
$> ./nameOfInstaller --mode executionModewhere executionMode has to be replaced with the appropriate one: text, unattended, gtk, qt…
Be sure to take into account that not all of the installation modes are available on all platforms. The table below describes the possibilities:
| Allowed installation modes by platform and flavor | |||||
|---|---|---|---|---|---|
InstallBuilder Flavor |
windows |
Linux |
OS X |
Other Unix |
Text mode only systems |
Regular |
|
|
|
|
|
Qt |
|
|
|
|
|
You may have noticed from the above table that text mode is not allowed on Windows. This is due to the fact that Windows InstallBuilder installers are compiled as GUI applications and thus, when executed, will not provide output in the console. This is a limitation of Windows itself, since an application cannot
be compiled at the same time as a console and GUI application.
Using --mode in the command line to select the installation mode is usually not required, as installers have a default installation mode. If for whatever reason the default mode cannot be initialized, then the installer will automatically and gracefully keep trying different UI modes. For example, if
a Desktop environment is not available, it will default to text mode (useful for remote Unix installations).
   <project>
      ...
      <defaultInstallationMode>xwindow</defaultInstallationMode>
      <unattendedModeUI>minimal</unattendedModeUI>
      ...
   </project>
This will set xwindow as the default. As not all of the modes are allowed in all platforms, you can configure the <defaultInstallationMode> tag using the <platformOptionsList>:
<project>
   ...
   <platformOptionsList>
     <platformOptions>
        <platform>linux</platform>
        <defaultInstallationMode>text</defaultInstallationMode>
     </platformOptions>
     <platformOptions>
        <platform>osx</platform>
        <defaultInstallationMode>qt</defaultInstallationMode>
     </platformOptions>
     <platformOptions>
        <platform>win32</platform>
        <defaultInstallationMode>windows</defaultInstallationMode>
     </platformOptions>
   </platformOptionsList>
   ...
</project>
Or reconfiguring the setting in the preBuildActionList based on the platform you are building:
   <preBuildActionList>
       <setInstallerVariable>
           <name>project.defaultInstallationMode</name>
           <value>text</value>
           <ruleList>
               <compareText text="${platform_name}" logic="equals" value="linux"/>
           </ruleList>
       </setInstallerVariable>
   </preBuildActionList>
Detecting the Execution Mode
Sometimes it is useful to know which mode the installer is running under, for example to skip certain checks or actions if the installer is running in unattended mode. This information can be obtained through built-in variables:
| Installation Modes | ||||
|---|---|---|---|---|
mode |
unattendedModeUI |
installer_ui |
installer_ui_detail |
installer_interactivity |
unattended |
none |
unattended |
unattended |
none |
unattended |
minimal |
unattended |
unattended |
minimal |
unattended |
minimalWithDialogs |
gui |
xwindow, win32, osx… |
minimalWithDialogs |
text |
N/A |
text |
text |
normal |
qt, gtk… |
N/A |
gui |
qt, gtk… |
normal |
Pages
Pages are the most common way of interacting with the end user. Some of the pages are built-in, but it is also possible to create parameters, which will be displayed as custom installer pages at runtime. Pages are only configurable in the installer. Currently, neither the uninstaller nor the AutoUpdate can contain custom pages. However, it is possible to have dialogs as part of the uninstallation process.
Custom Pages
Projects and components can contain a <parameterList>. For each first level parameter contained, a corresponding page will be displayed at runtime. You can control which of these pages will be displayed attaching rules or configuring the <ask> property of the parameter.
Depending on the type of the parameter defined, it will be rendered differently. For example, in graphical mode:
-
<booleanParameter>: A checkbox or a pair of radiobuttons depending on its<displayStyle>. -
<stringParameter>: A text entry. -
<directoryParameter>and<fileParameter>: A text entry with an associated browse button. -
<linkParameter>: An hyperlink-type text. -
<passwordParameter>: A text entry which will display characters entered as * -
<labelParameter>: A simple text label. -
<choiceParameter>: A combobox or a set of radiobuttons, depending on its<displayStyle> -
<licenseParameter>: A license page with Yes/No buttons
You can find a detailed explanation of all the available parameters as well as how they are represented in the Available Parameters section.
To create complex page layouts you can use the special parameter <parameterGroup> which allows grouping multiple parameters, including other <parameterGroup> elements:
<parameterGroup>
   <name>configuration</name>
   <title>Configuration</title>
   <explanation></explanation>
   <parameterList>
      <stringParameter name="username" description="Username"/>
      <passwordParameter name="password" description="Password"/>
   </parameterList>
</parameterGroup>
The sample code above will group two simple parameters to create a user-password form. By default the alignment is vertical but it can be modified using the <orientation> tag:
<parameterGroup>
   <name>configuration</name>
   <title>Configuration</title>
   <explanation></explanation>
    <orientation>horizontal</orientation>
   <parameterList>
      <stringParameter name="username" description="Username"/>
      <passwordParameter name="password" description="Password"/>
   </parameterList>
</parameterGroup>
The below code will generate a complex page layout using multiple parameter combinations. You can view the result in Figure 51:
<parameterGroup>
   <name>configuration</name>
   <title>Configuration</title>
   <explanation></explanation>
   <parameterList>
       <parameterGroup>
          <name>adminaccount</name>
          <title></title>
          <explanation>Admin Account</explanation>
          <orientation>horizontal</orientation>
          <parameterList>
             <stringParameter>
                <name>username</name>
                <description>Username</description>
                <allowEmptyValue>1</allowEmptyValue>
                <width>20</width>
             </stringParameter>
             <passwordParameter>
                <name>password</name>
                <description>Password</description>
                <allowEmptyValue>1</allowEmptyValue>
                <width>20</width>
             </passwordParameter>
          </parameterList>
       </parameterGroup>
       <parameterGroup>
          <name>serveraddres</name>
          <explanation>Server Address</explanation>
          <orientation>horizontal</orientation>
          <parameterList>
             <stringParameter>
                <name>ipaddress</name>
                <description>IP and Port</description>
                <allowEmptyValue>1</allowEmptyValue>
                <width>30</width>
             </stringParameter>
             <stringParameter>
                <name>port</name>
                <description>:</description>
                <allowEmptyValue>1</allowEmptyValue>
                <width>5</width>
             </stringParameter>
          </parameterList>
       </parameterGroup>
       <booleanParameter>
          <name>advancedconfig</name>
          <description>Enable advance</description>
          <explanation>Would you like to perform an advanced installation?</explanation>
          <displayStyle>checkbox-left</displayStyle>
       </booleanParameter>
       <choiceParameter>
          <name>dbmsserver</name>
          <description>DBMS</description>
          <explanation>Database server</explanation>
          <allowEmptyValue>1</allowEmptyValue>
          <displayType>combobox</displayType>
          <width>30</width>
          <optionList>
             <option>
                <description>MySQL server</description>
                <text>MySQL</text>
                <value>mysql</value>
             </option>
             <option>
                <description>PostgreSQL server</description>
                <text>PostgreSQL</text>
                <value>postgres</value>
             </option>
          </optionList>
       </choiceParameter>
   </parameterList>
</parameterGroup>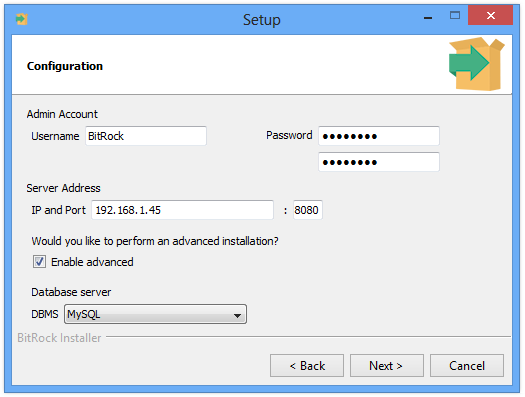
The example above will be displayed as follows in text mode:
Admin Account

Username []: user

Password :
 :
Server Address

IP and Port []: 127.0.0.1

: []: 80

Would you like to perform an advanced installation?

Enable advance [y/N]: y


Database server

DBMS

[1] MySQL: MySQL server
[2] PostgreSQL: PostgreSQL server
Please choose an option [1] : 1
Built-in Pages
In addition to the user pages registered for each parameter, a set of built-in pages is also added to the installer. These pages, along with their appearance order, are detailed below:
-
Welcome page (
welcome): This is the first page displayed. It displays a welcome message to the installation wizard. The text in this page can be configured by modifying the following strings (please refer to the customization section for a detailed explanation of the process):-
Installer.Welcome.Title=Setup - %1$s -
Installer.Welcome.Text=Welcome to the %1$s Setup Wizard.
-
The field specifier %1$s will be internally replaced by the project full name.
In addition to the above text, if the installer was created with an unregistered version of InstallBuilder, the text "Created with an evaluation version of InstallBuilder" will be appended.
-
Component Selection page (
components): This page will be displayed only if the setting<allowComponentSelection>is enabled. By default, it will be displayed right after theinstalldirpage or after thewelcomepage if theinstalldirpage is hidden. -
Ready To Install page (
readytoinstall): This page is displayed after all of the custom pages and before starting the unpacking stage of the installer. It displays the following configurable messages:-
Installer.Ready.Title=Ready to Install -
Installer.Ready.Text1=Setup is now ready to begin installing %1$s on your computer.
-
-
Installation page (
installation): After thereadytoinstallpage is acknowledged, the unpacking process begins. The process takes place on theinstallationpage while displaying a progress bar. The progress bar also shows a progress text with the path of the files being unpacked but this can be disabled through the project property<showFileUnpackingProgress>:
<project>
   ...
   <showFileUnpackingProgress>0</showFileUnpackingProgress>
   ...
</project>
While displaying the installation page, the back and next buttons are disabled although the installation can still be aborted by closing the installer window or pressing cancel.
-
Installation Finished page (
installationFinished): This is the last page displayed in the installer. The back button is disabled so the user cannot go back. This page displays the below built-in messages:-
Installer.Installation.Finished.Title=Completing the %1$s Setup Wizard -
Installer.Installation.Finished.Text=Setup has finished installing %1$s on your computer.
-
Final Page options
If a <readmeFile> is defined in the project, a checkbox will be added to the final page with the following text:
`Installer.ReadmeFile.View=View Readme File`
If the checkbox is checked, then the contents of the readme file will be displayed.
If a <finalPageActionList> has been defined in the XML project, a checkbox and a description will be displayed for all of the first level actions (an <actionGroup> will display just one checkbox even if it contains multiple actions in its <actionList>). The behavior and appearance of the page depends on the properties of the actions:
-
The state of the checkbox when pressing
Finishwill decide if the action will be executed or not. The default value of the checkbox is the<run>property of the action. -
The action
<progressText>property provides the default text description. -
If the
<show>property of the action is set to'0', the action will be hidden but still executed if its<run>property is enabled. -
An additional explanation text is displayed if the action includes a configured
<explanation>.
If any of the actions in the final page include rules and they do not evaluate to true, the action is not displayed and won’t be executed.
The following is an example <finalPageActionList> showcasing the options outlined above.
<finalPageActionList>
<!-- This will launch the application in background -->
<runProgram progressText="Launch ${project.fullName}" >
<program>${installdir}/bin/app.exe</program>
<programArguments>&</programArguments>
</runProgram>
<!-- This is disabled by default -->
<showText progressText="View log" run="0" text="${myLog}"/>
<!-- This will be displayed as single checkbox -->
<actionGroup progressText="Register the installation">
<explanation>Registering the installation will grant you access to extended features and support.</explanation>
<actionList>
<readFile path="${installdir}/installationid.txt" name="id"/>
<httpPost url="http://www.example.com/register.php" filename="${installdir}/activationUrl">
<queryParameterList>
<queryParameter name="userid" value="${id}"/>
<queryParameter name="username" value="${username}"/>
<queryParameter name="pass" value="${password}"/>
</queryParameterList>
</httpPost>
<readFile path="${installdir}/activationUrl" name="url"/>
<launchBrowser url="${url}"/>
</actionList>
</actionGroup>
<!-- This will be always executed but will not be displayed -->
<launchBrowser url="http://www.example.com/welcome" run="1" show="0"/>
</finalPageActionList>Another common scenario is asking the end user if he or she wants to start the installed application:
<finalPageActionList>
<runProgram>
<progressText>Do you want to launch ${project.fullName} now?</progressText>
<program>${installdir}/bin/myprogram</program>
<!-- Append & to the arguments so the program is executed in the
background and the parent process, the installer, can successfully
end. If you do not launch it in background, the installer will remain
running until the launched application is closed -->
<programArguments>&</programArguments>
</runProgram>
</finalPageActionList>
Controlling the Flow of the Pages
The default flow of the pages is determined by the position in which they appear in the XML project but this flow can also be controlled through the <insertAfter> and <insertBefore> tags:
    <parameterList>
        <directoryParameter>
            <name>installdir</name>
            <description>Installer.Parameter.installdir.description</description>
            <explanation>Installer.Parameter.installdir.explanation</explanation>
            <value></value>
            <default>${platform_install_prefix}/${project.shortName}-${project.version}</default>
            ...
        </directoryParameter>
        <licenseParameter>
            <name>myLicense</name>
            <title>License Agreement</title>
            <insertBefore>installdir</insertBefore>
            <description>Please read the following License Agreement. You must accept the terms of this agreement before continuing with the installation.</description>
            <explanation></explanation>
            ...
        </licenseParameter>
    </parameterList>
In the example above, even if the <licenseParameter> is placed after the <directoryParameter>, it will be displayed before because you have explicitly declared it with <insertBefore>installdir</insertBefore>.
This can also be used to refer to built-in pages. The list below summarizes the key names for all of the built-in pages:
-
welcome: The welcome page -
components: The component selection page -
readytoinstall: The ready to install page -
installation: Main installation page -
installationFinished: The final page
However, sometimes you need to control this flow dynamically at runtime base on certain conditions. For this purpose, InstallBuilder defines two built-in variables: next_page and back_page. Modifying their values changes the pages displayed when pressing the Next and Back buttons.
For example:
<setInstallerVariable name="next_page" value="installdir" />Would make the installer show the installdir page after pressing Next regardless of how they were ordered.
Another useful application of this method is to replace the readytoinstall page with your own custom page:
<parameterList>
  ...
  <!-- Our last parameter -->
  <labelParameter>
     <name>summary</name>
     <title>Summary</title>
     <explanation>You are about to install ${project.fullName}.

Please review the below information:

Installation Directory: ${installdir}

Username: ${username}

License File: ${license_file}

Apache Port: ${apache_port}

MySQL Port: ${mysql_port}

Click next if the information is correct
</explanation>
     <postShowPageActionList>
        <!-- This will skip the readytoinstall page -->
        <setInstallerVariable name="next_page" value="installation" />
     </postShowPageActionList>
  </labelParameter>
</parameterList>
In addition to custom page names and built-in pages, a new value is included for convenience: same. When setting next_page or back_page to same, the installer will remain on the current page, no matter its name.
One typical place to set the next_page variable is in the <postShowPageActionList> and <validationActionList>
Dialogs
Another useful way of interacting with the end user is using pop-ups. Pop-ups are especially convenient in the <preUninstallationActionList> and <postUninstallationActionList> because the uninstaller does not allow custom pages.
-
<showInfo>: Prompt an info dialog to the user. -
<showWarning>: Shows a warning dialog with the given text. -
<throwError>: Generate an error inside the installer so the installer will exit. The only exception to this is when abortOnError equals zero or the action is inside a validationActionList, in which case it will prompt an error dialog to the user, but will not exit the installer. -
<showText>: Display a read-only text dialog to the user. -
<showQuestion>: Prompt a question to the user. The result is stored as yes or no in the given variable name. -
<showPasswordQuestion>: Ask the user to enter a password. -
<showChoiceQuestion>: Prompt a choice question dialog to the user. -
<showInfo>: Prompt an info dialog to the user. -
<showProgressDialog>: Display an indeterminate progressmeter in a popup window to execute a list of actions. -
<showStringQuestion>: Ask the user a question.
You can find a detailed explanation and examples of usage of all of these dialogs in the Dialog Actions section.