User Input
Parameters
In most cases, you will need to request some information from your end users, such as the installation directory or username and password. For this purpose, InstallBuilder allows the creation of custom pages, which make it easy to request and validate user input. In addition, the provided information will automatically be stored in installer variables so it can be used later in the installation process, for example to pass it as arguments to a script in the post-installation. You can define such pages by adding parameters to the <parameterList> section in the XML project file.
There are different types of parameters: strings, booleans, option selection, and so on. Each one of them will be displayed to the user appropriately through the GUI and text interfaces. For example, a file parameter will be displayed with a graphical file selection button next to it and an option selection parameter will be displayed as a combobox. The parameters will also be available as command line options and as installer variables.
 <fileParameter>
     <name>apacheconfig</name>
     <cliOptionName>apacheconfig</cliOptionName>
     <ask>yes</ask>
     <default>/etc/httpd/conf/httpd.conf</default>
     <title>Configuring Apache</title>
     <explanation>Please specify the location of the Apache configuration file</explanation>
     <description>Apache Configuration File</description>
     <mustBeWritable>yes</mustBeWritable>
     <mustExist>1</mustExist>
     <value></value>
 </fileParameter>
This will create the appropriate GUI screens for the graphical installers and make the parameter available as the command line option --apacheconfig and as the installer variable ${apacheconfig}. It is also possible to have a different name for the command line flag and the internal variable name using the <cliOptionName> tag. For example, the installdir parameter (accessible using ${installdir}) is usually mapped to the --prefix command line flag:
 <directoryParameter>
   <name>installdir</name>
   ...
   <cliOptionName>prefix</cliOptionName>
   ...
 </directoryParameter>
A number of fields are common across all parameters:
-
<name>: Name of the parameter. This will be used to create the corresponding installer variable and command line option. Because of that, it may only contain alphanumeric characters. -
<value>: Value for the parameter. -
<default>: Default value, in case one is not specified by the user. -
<explanation>: Long description for the parameter. -
<description>: Short description for the parameter. -
<title>: Title that will be displayed for the corresponding installer page. If none is specified, the<description>field will be used instead. -
<cliOptionName>: Command line option associated with the parameter. If none is provided, it will default to the value of the<name>field. -
<ask>: Whether or not to show the page to the end user (it can still be set through the command line interface). If it is set to0, the page not only won’t be displayed but also the associated command line option won’t appear in the help menu. -
<leftImage>: When using<style>custom</style>inside the<project>tag in your project file, it displays a custom PNG or GIF image at the left side of the installer page associated with this parameter. Its purpose is the same as the<leftImage>property inside the<project>tag, but allows you set a different image for each parameter page.
Each one of the fields can reference installer variables (${project.fullName}, ${installdir}, and so on) that will be substituted at runtime.
|
Note
|
The As If you want to allow your users to provide an empty value but still display an initial value in the page, you should set This way, the user can provide an empty welcome message. |
Configuring Parameters At Runtime
Parameters can be configured at runtime by modifying their properties using the <setInstallerVariable> action as explained in the Variables section. Although any action list can be used, the recommended approach is to use their <preShowPageActionList> and <posShowPageActionList> action lists, when possible:
-
<preShowPageActionList>: This Action List is executed right before displaying the page containing the parameter. It is really useful to modify the information displayed. For example, if you are working to implement a summary page using a<labelParameter>, you should construct the information in its<preShowPageActionList>:
<labelParameter>
<name>summary</name>
<title>Summary</title>
<explanation></explanation>
<preShowPageActionList>
<setInstallerVariable>
<name>text</name>
<value>You are about to install ${project.fullName}.
Please review the below information:
Installation Directory: ${installdir}
Username: ${username}
License File: ${license_file}
Installed Components:
</value>
</setInstallerVariable>
<foreach>
<variables>component</variables>
<values>component1 component2 component3</values>
<actionList>
<!-- Just include selected Components -->
<continue>
<ruleList>
<isFalse>
<value>${component(${component}).selected}</value>
</isFalse>
</ruleList>
</continue>
<setInstallerVariable>
<name>text</name>
<value>${text}
${component(${component}).description}</value>
</setInstallerVariable>
</actionList>
</foreach>
</preShowPageActionList>
</labelParameter>-
<postShowPageActionList>: This Action List is executed after clicking Next in the page containing the parameter and after successfully executing the<validationActionList>. One example of how this is useful is configuring installation settings based on the user input:
<choiceParameter>
<name>installMode</name>
<description>Select the installation mode</description>
<explanation></explanation>
<displayType>combobox</displayType>
<width>30</width>
<optionList>
<option>
<description>Upgrade</description>
<text>Upgrade</text>
<value>upgrade</value>
</option>
<option>
<description>Uninstall</description>
<text>Uninstall</text>
<value>uninstall</value>
</option>
</optionList>
<postShowPageActionList>
<!-- Set upgrade mode in the project -->
<setInstallerVariable>
<name>project.installationType</name>
<value>upgrade</value>
<ruleList>
<compareText text="${installMode}" logic="equals" value="upgrade"/>
</ruleList>
</setInstallerVariable>
</postShowPageActionList>
</choiceParameter>Validating User Input
Parameters can also include checks to validate the data introduced through their <validationActionList>. The actions included in this <actionList> will be executed right after clicking Next. If an error occurs, it will be displayed and, instead of aborting the installation, the page will be redrawn. For example, you can use the snippet below to check if a provided password is strong enough:
<passwordParameter>
<name>password</name>
<description>Password</description>
<explanation>Administrator account password. It must include at least 2 uppers, 2 lowers, 2 digits and 2 special characters and be at least 10 characters long.</explanation>
<value></value>
<default></default>
<allowEmptyValue>1</allowEmptyValue>
<descriptionRetype></descriptionRetype>
<width>20</width>
<validationActionList>
<throwError text="The password provided is not strong enough">
<ruleList>
<regExMatch>
<logic>does_not_match</logic>
<pattern>^(?=(?:\D*\d){2})(?=(?:[^a-z]*[a-z]){2})(?=(?:[^A-Z]*[A-Z]){2})(?=(?:[^!@#$%^&*+=]*[!@#$%^&*+=]){2}).{10,}$</pattern>
<text>${password}</text>
</regExMatch>
</ruleList>
</throwError>
</validationActionList>
</passwordParameter>Or validate if the user has enough free disk space install your application:
<directoryParameter>
<name>installdir</name>
<value></value>
<description>Installation Directory</description>
<explanation>Please specify the directory where ${project.fullName} will be installed</explanation>
<default>${platform_install_prefix}/${project.shortName}-${project.version}</default>
<cliOptionName>prefix</cliOptionName>
<ask>yes</ask>
<mustBeWritable>yes</mustBeWritable>
<validationActionList>
<throwError>
<text>You don't have enough disk space to install the application,
please select another installation directory</text>
<ruleList>
<checkFreeDiskSpace>
<logic>less</logic>
<path>${installdir}</path>
<!-- ${required_diskspace} is automatically calculated by
InstallBuilder with all the files packed -->
<size>${required_diskspace}</size>
</checkFreeDiskSpace>
</ruleList>
</throwError>
</validationActionList>
</directoryParameter>You must to take into account that these validations won’t be executed in unattended mode (as explained here). If you want to validate the information provided through command line when running in unattended mode, you can include the validations in the <preInstallationActionList>, executed after the command line options are processed:
<preInstallationActionList>
<actionGroup>
<actionList>
<!-- Validate the password is not empty -->
<throwError text="You must provide a non-empty password using --masterpassword command line flag">
<ruleList>
<compareText text="${masterpassword}" logic="equals" value=""/>
</ruleList>
</throwError>
<!-- Validate the installation directory has enough disk space -->
<throwError>
<text>You don't have enough disk space to install the application,
please select another installation directory</text>
<ruleList>
<checkFreeDiskSpace>
<logic>less</logic>
<path>${installdir}</path>
<!-- ${required_diskspace} is automatically calculated by
InstallBuilder with all the files packed -->
<size>${required_diskspace}</size>
</checkFreeDiskSpace>
</ruleList>
</throwError>
...
</actionList>
<ruleList>
<compareText>
<text>${installer_interactivity}</text>
<logic>does_not_equal</logic>
<value>normal</value>
</compareText>
</ruleList>
</actionGroup>
</preInstallationActionList>
...
<parameterList>
<passwordParameter>
<ask>yes</ask>
<name>masterpassword</name>
<allowEmptyValue>0</allowEmptyValue>
<description>Password</description>
...
</passwordParameter>
<directoryParameter>
<name>installdir</name>
<value></value>
<default>${platform_install_prefix}/${project.shortName}-${project.version}</default>
...
</directoryParameter>
...
</parameterList>Available Parameters
This section provides an exhaustive list of all of the available parameters.
The <stringParameter> allows you to request a text string from the user. It accepts all of the common options.
<stringParameter>
<name>hostname</name>
<default>localhost</default>
<value></value>
<ask>1</ask>
<description>Hostname</description>
<explanation>Please enter the hostname for your application server.</explanation>
</stringParameter>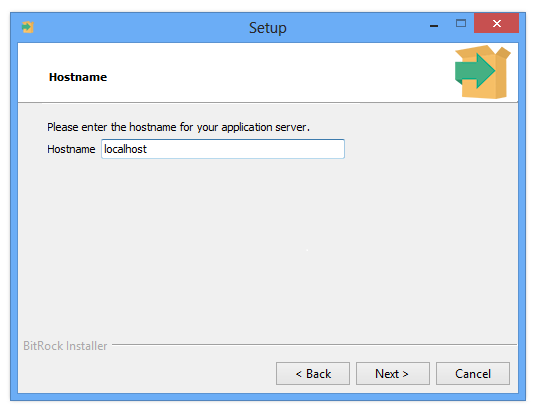
The <labelParameter> allows you to display a string of read-only text inside an installer page. Optionally, you can include an image to the left side of the text.
<labelParameter>
<name>label</name>
<title>labelParameter test</title>
<description>This is a warning message inside an installer page.</description>
<image>/path/to/icons/warning.png</image>
</labelParameter>It is also useful to display a read-only version of the installation directory:
<!-- The installation directory won't be selectable by the end user so we
hide it setting ask=0 -->
<directoryParameter>
<name>installdir</name>
...
<description>Installation Directory</description>
<default>${platform_install_prefix}/${project.shortName}-${project.version}</default>
<ask>0</ask>
...
</directoryParameter>
<!-- We display the read-only version of the installation directory -->
<labelParameter>
<name>readOnlyInstalldir</name>
<title>Installation Directory</title>
<explanation>Directory where ${project.fullName} will be installed</explanation>
<description>Installation Directory: ${installdir}</description>
</labelParameter>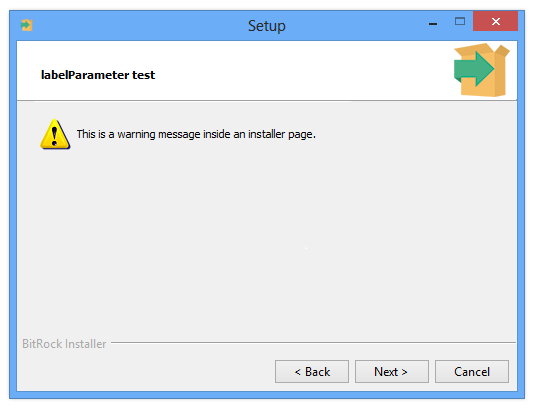
The <linkParameter> displays a hyperlink-like label or a button, which executes its <clickedActionList> when clicked, usually launching a browser. The link parameter is intended to be displayed in GUI mode. In text mode, the user will be asked whether or not to run the associated actions, similarly to how a <booleanParameter> will behave.
<linkParameter>
<name>visitwebsite</name>
<description>More information.</description>
<clickedActionList>
<launchBrowser url="http://example.com/more_information.html" />
</clickedActionList>
</linkParameter>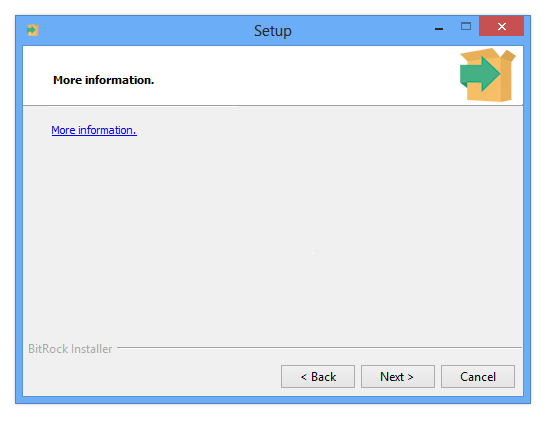
The <fileParameter> asks the user to enter a file. They also support additional fields:
-
<mustExist>: Whether or not to require that the file must already exist. -
<mustBeWritable>: Whether or not to require that the file must be writable. -
<osxBundlesAreFiles>: Whether or not OS X bundles (*.app and *.bundle) will be considered files. The setting will just have effect on OS X, in other platforms they will be always considered directories.
<fileParameter>
<name>licenseFile</name>
<value></value>
<description>License File</description>
<explanation>Please specify the downloaded license file</explanation>
<ask>yes</ask>
<mustBeWritable>yes</mustBeWritable>
</fileParameter>Usually, on OS X, some bundles are considered as files although they really are special directories. Using the <osxBundlesAreFiles> tag, you can configure whether you want the parameter to validate them as files or to complain when trying to select them. Note that *.bundle and *.app bundles will be considered as *.framework bundles and are not treated as files by the OS.
<fileParameter>
<name>previousProductPath</name>
<value></value>
<description>Previous Installation Path</description>
<explanation>The installer cannot find "${project.shortName}-${oldVersion}.app" bundle under /Applications. Please manually select it</explanation>
<osxBundlesAreFiles>1</osxBundlesAreFiles>
<ruleList>
<fileExists path="/Applications/${project.shortName}-${oldVersion}.app" negate="1"/>
</ruleList>
</fileParameter>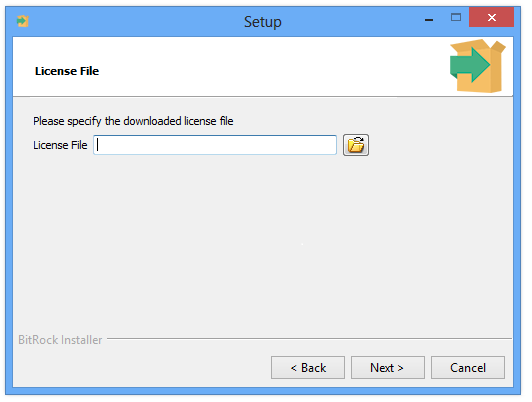
The <directoryParameter> asks the user to enter a directory. They also support additional fields:
-
<mustExist>: Whether or not to require that the directory must already exist. -
<mustBeWritable>: Whether or not to require that the directory must be writable. -
<osxBundlesAreFiles>: Whether or not OS X bundles (*.app and *.bundle) will be considered files. The setting will just have effect on OS X, in other platforms they will be always considered directories
  <directoryParameter>
     <name>installdir</name>
     <value></value>
     <description>Installation Directory</description>
     <explanation>Please specify the directory where ${project.fullName} will be installed</explanation>
     <default>${platform_install_prefix}/${project.shortName}-${project.version}</default>
     <cliOptionName>prefix</cliOptionName>
     <ask>yes</ask>
    <mustBeWritable>yes</mustBeWritable>
  </directoryParameter>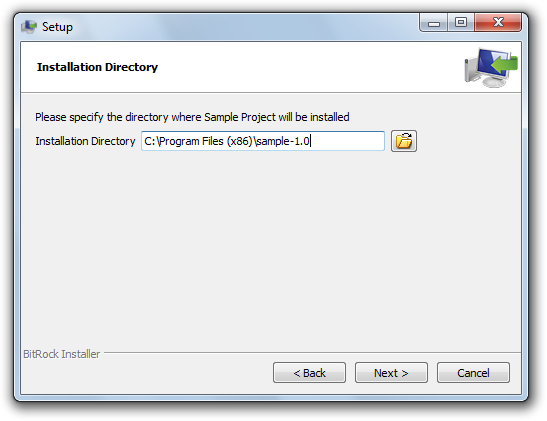
The <booleanParameter> is identical to the <stringParameter>, except it accepts either a 1 or a 0 as a value. You can control how the boolean parameter is displayed in GUI mode using the <displayStyle> tag with the values of combobox, checkbutton-left and checkbutton-right.
    <booleanParameter>
      <name>createdb</name>
      <ask>yes</ask>
      <default>1</default>
      <title>Database Install</title>
      <explanation>Should initial database structure and data be created?</explanation>
      <value>1</value>
    </booleanParameter>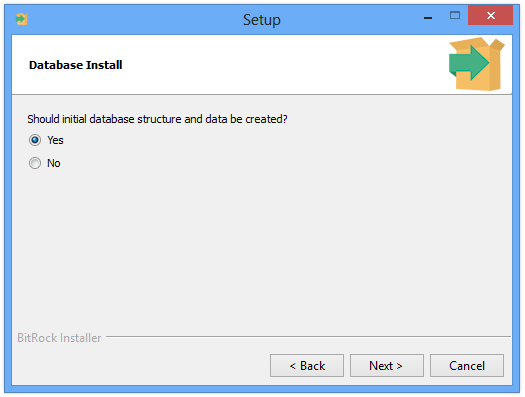
The <infoParameter> will display a read-only text information page. It does not support the <cliOptionName> field as it is a read-only parameter.
    <infoParameter>
      <name>serverinfo</name>
      <title>Web Server</title>
      <explanation>Web Server Settings</explanation>
      <value>Important Information! In the following screen you will be asked to provide (...)</value>
    </infoParameter>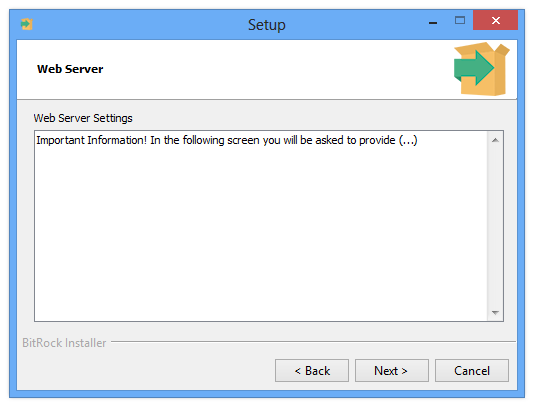
In InstallBuilder for Qt, the <infoParameter> is also capable of displaying HTML text:
    <infoParameter>
      <name>serverinfo</name>
      <title>Web Server</title>
      <explanation>Web Server Settings</explanation>
      <value>Important Information! In the following screen you will be asked to provide (...)</value>
      <!-- CDATA is just used to avoid the need of escaping the HTML tags -->
      <htmlValue><![CDATA[
<H1><font color="red">Important Information! </font></H1><br/>
In the following screen you will be asked to provide (...)
]]></htmlValue>
    </infoParameter>
Please note you still have to provide a plain text version in the <value> to be displayed in non-qt modes (text, gtk, win32, osx).
A <choiceParameter> allows the user to select a value from a predefined list. In GUI mode, it will be represented by a combobox or a group of radio buttons (depending on the configured <displayType>). It takes an extra field, <optionList>, which contains a list of value/text pairs. The <text> will be the description presented to the user for that option and the <value> will be the value of the associated installer variable if the user selects that option. You can control how the choice parameter is displayed in GUI modes using the <displayType> tag with the values of combobox and radiobuttons.
 <choiceParameter>
      <ask>1</ask>
      <default>http</default>
      <description>Which protocol?</description>
      <explanation>Default protocol to access the login page.</explanation>
      <title>Protocol Selection</title>
      <name>protocol</name>
      <optionList>
        <option>
          <value>http</value>
          <text>HTTP (insecure)</text>
          <description>Hypertext Transfer Protocol</description>
          <image>http.png</image>
        </option>
        <option>
          <value>https</value>
          <text>HTTPS (secure)</text>
          <description>Hypertext Transfer Protocol Secure</description>
          <image>https.png</image>
        </option>
      </optionList>
 </choiceParameter>
By default, the order in which the choices are displayed in the installer page is the same in which they are listed in the XML code. This behavior can be modified through the <ordering> tag which accepts the below values:
-
default: List the choices in the same order used in the XML project. -
alphabetical: Sort the choices in alphabetical order. -
alphabeticalreverse: Sort the choices in reverse alphabetical order.
A <passwordParameter> allows the user to input a password and confirm it. The password will not be echoed back to the user in text mode installations and will be substituted by * characters in GUI mode installations.
They also support additional fields:
-
<askForConfirmation>: If set to 1 (the default value), a second entry field will be displayed, forcing the user to retype the password, receiving an error if both fields do not match -
<descriptionRetype>: Description used as the label for the password retype field displayed when enabling<descriptionRetype>.
      <passwordParameter>
        <ask>yes</ask>
        <name>masterpassword</name>
        <description>Password</description>
        <askForConfirmation>1</askForConfirmation>
        <descriptionRetype>Retype password</descriptionRetype>
        <explanation>Please provide a password for the database user</explanation>
        <cliOptionName>password</cliOptionName>
        <default/>
        <value/>
      </passwordParameter>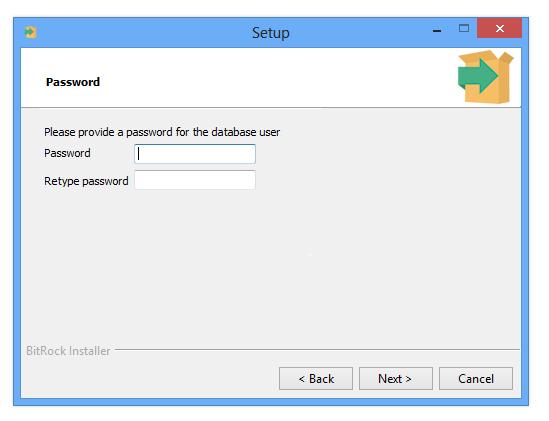
A <licenseParameter> presents a license screen to the user containing the text specified in the <file> field. An optional <fileEncoding> field allows you to specify the encoding and a <wrapText> field allows you to specify whether the license text should be wrapped to fit the screen. It does not support the <cliOptionName> field as it is a read-only parameter.
<licenseParameter>
  <name>javalicense</name>
  <fileEncoding>utf-8</fileEncoding>
  <file>/path/to/license.txt</file>
</licenseParameter>
In InstallBuilder for Qt, you can also provide an HTML license file using the <htmlFile> tag:
<licenseParameter>
  <name>javalicense</name>
  <fileEncoding>utf-8</fileEncoding>
  <file>/path/to/license.txt</file>
  <htmlFile>/path/to/license.html</htmlFile>
</licenseParameter>
A plain text license is still provided to be displayed in non-qt modes (text, gtk, win32, osx). On Unix, you can easily generate a plain text version of your HTML license using the lynx command:
$> lynx -dump license.html > license.txtPopulating Choice parameters at Runtime
In addition to hard-coding the options of a <choiceParameter> when writing your XML project, you can also modify them at runtime using the <addChoiceOptions>, <removeChoiceOptions> and <addChoiceOptionsFromText> actions.
The snippets below explains the simplest approach, using the <addChoiceOptions> action:
 <addChoiceOptions>
    <name>language</name>
    <optionList>
      <option>
        <value>en</value>
        <text>English</text>
      </option>
      <option>
        <value>es</value>
        <text>Spanish</text>
      </option>
    </optionList>
 </addChoiceOptions>
The action takes the <name> of an existing <choiceParameter> and adds the specified options hardcoded in the <optionList>. It is useful when you need to modify the choices of a <choiceParameter> depending on some other configuration but you know the set of choices for each of them.
One of the limitations of the action is that the <value> must be a valid key identifier, that is, it can only contain alphanumeric characters and underscores so you cannot use variables when defining it.
A more powerful approach is to use the <addChoiceOptionsFromText> action, which allows you to provide the list of options in plain text:
 <addChoiceOptionsFromText>
    <name>language</name>
    <text>
jp=Japanese
jp.description=Language spoken in Japan
de=German
de.description=Language spoken in Germany
it=Italian
it.description=Language spoken in Italy
pl=Polish
pl.description=Language spoken in Poland
ru=Russian
ru.description=Language spoken in Russia
</text>
 </addChoiceOptionsFromText>
The keys in the text will be used to set the <value> property of option. The key value (the righthand side) will be used to set the <text> property.
Optionally, if a key has a .description suffix and matches an existing <value>, the key value will be used to set the <description> property.
Contrary to the <addChoiceOptions> action, the <addChoiceOptionsFromText> action allows using variables in its <text>:
 <addChoiceOptionsFromText>
    <name>choice</name>
    <text>
${value1}=${text1}
${value1}.description=${description1}
${value2}=${text2}
${value2}.description=${description2}
${value3}=${text3}
${value3}.description=${description3}
</text>
 </addChoiceOptionsFromText>
The <addChoiceOptionsFromText> action is very useful when you have a long list of options to add or if you are going to generate the choices at runtime based on the output of some external program. For example, if you want to generate a language list based on the contents of your lang directory, you could use the below:
<!-- Get list of files -->
<setInstallerVariableFromScriptOutput>
<name>languages</name>
<exec>find</exec>
<execArgs>*.lng</execArgs>
<workingDirectory>${installdir}/lang</workingDirectory>
</setInstallerVariableFromScriptOutput>
<!-- Iterate over the files and create the choice text file -->
<setInstallerVariable name="choiceText" value=""/>
<foreach variables="file" values="${languages}">
<actionList>
<!-- Strip the extension to create the key -->
<setInstallerVariableFromRegEx name="key" pattern="([^\.])*" substitution="\1" text="${file}"/>
<!-- Add a new choice option to the text 
 is the escaped sequence for \n-->
<setInstallerVariable name="choiceText" value="${choiceText}
lang_${key}=${file}"/>
</actionList>
</foreach>
<addChoiceOptionsFromText>
<name>language</name>
<text>${choiceText}</text>
</addChoiceOptionsFromText>It also allows using variables in the <text> of the choices
When creating the options at runtime, especially in the <preShowPageActionList> of the parameter, you may end up with duplicate options if the user displays the page more than once (each time the page is displayed, the <preShowPageActionList> will add the options again). In those scenarios you can use a <removeChoiceOptions> action:
 <removeChoiceOptions>
    <name>language</name>
    <options>en,es,jp</options>
 </removeChoiceOptions>
The format of the <options> tag is different from similar actions, since you are not interested in the <text> of the option to remove. It is defined as a comma separated list of options, each of them matching the <value> of an existing choice option. However, if you do not know which options were added, as in the <addChoiceOptionsFromText>, you can still delete all of the options of the parameter if you provide an empty value to the <options> tag:
<removeChoiceOptions name="language"/>In a real world example:
  <choiceParameter>
      <ask>1</ask>
      <default></default>
      <description></description>
      <explanation>Installation Language of the installer application.</explanation>
      <title>Installation Language</title>
      <name>language</name>
      <preShowPageActionList>
          <removeChoiceOptions name="language"/>
          <!-- Get the list of languages and create the choice options -->
          <setInstallerVariableFromScriptOutput ... />
          ...
          <setInstallerVariable name="choiceText" value=""/>
          <foreach variables="file" values="${languages}">
              <actionList>
              ...
              </actionList>
          </foreach>
          <addChoiceOptionsFromText name="language" text="${choiceText}"/>
      </preShowPageActionList>
   </choiceParameter>
For all of the above actions, if the specified parameter to be modified does not exist, the action will be skipped.
Another useful example would be displaying the list of your installed applications and letting the user select one to uninstall:
<choiceParameter>
  <name>applicationToDelete</name>
  <description>Select the Application to uninstall</description>
  <displayType>combobox</displayType>
  <ordering>default</ordering>
  <width>40</width>
  <postShowPageActionList>
    <foreach>
      <values>${installedApplications}</values>
      <variables>key name value</variables>
      <actionList>
        <md5 text="${key}" variable="md5"/>
        <actionGroup>
          <actionList>
            <registryGet>
              <key>${key}</key>
              <name>UninstallString</name>
              <variable>uninstallCmd</variable>
            </registryGet>
            <showProgressDialog>
              <title>Uninstalling ${value}</title>
              <actionList>
                <runProgram>
                  <program>${uninstallCmd}</program>
                  <programArguments>--mode unattended</programArguments>
                </runProgram>
              </actionList>
            </showProgressDialog>
            <break/>
          </actionList>
          <ruleList>
            <compareText>
              <text>${md5}</text>
              <logic>equals</logic>
              <value>${applicationToDelete}</value>
            </compareText>
          </ruleList>
        </actionGroup>
      </actionList>
    </foreach>
  </postShowPageActionList>
  <preShowPageActionList>
    <removeChoiceOptions>
      <name>applicationToDelete</name>
      <options></options>
    </removeChoiceOptions>
    <registryFind>
      <findAll>1</findAll>
      <keyPattern>*</keyPattern>
      <namePattern>DisplayName</namePattern>
      <rootKey>HKEY_LOCAL_MACHINE\SOFTWARE\Microsoft\Windows\CurrentVersion\Uninstall</rootKey>
      <searchDepth>1</searchDepth>
      <variable>installedApplications</variable>
    </registryFind>
    <setInstallerVariable>
      <name>text</name>
      <value></value>
    </setInstallerVariable>
    <foreach>
      <values>${installedApplications}</values>
      <variables>key name value</variables>
      <actionList>
        <registryGet>
          <key>${key}</key>
          <name>Publisher</name>
          <variable>publisher</variable>
        </registryGet>
        <actionGroup>
          <actionList>
            <md5 text="${key}" variable="md5"/>
            <setInstallerVariable>
              <name>text</name>
              <value>${text}
${md5}=${value}</value>
            </setInstallerVariable>
          </actionList>
          <ruleList>
            <compareText>
              <logic>equals</logic>
              <text>${publisher}</text>
              <value>${project.vendor}</value>
            </compareText>
          </ruleList>
        </actionGroup>
      </actionList>
    </foreach>
    <addChoiceOptionsFromText>
      <name>applicationToDelete</name>
      <text>${text}</text>
    </addChoiceOptionsFromText>
  </preShowPageActionList>
</choiceParameter>
Another example might be showing a list of drives for the user to pre-select on Microsoft Windows. The following actions will create and execute a Visual Basic script, whose output will be used to populate the choices of the parameter:
<project>
  ...
  <initializationActionList>
    <writeFile>
      <encoding>utf-8</encoding>
      <path>${system_temp_directory}/drives.vbs</path>
      <text>Set objFSO = CreateObject("Scripting.FileSystemObject")
Set colDrives = objFSO.Drives
For Each objDrive in colDrives
  If objDrive.DriveType = 2 Then
    Wscript.Echo objDrive.DriveLetter
  End If
Next
  </text>
    </writeFile>
    <setInstallerVariableFromScriptOutput>
      <exec>cscript.exe</exec>
      <execArgs>//NOLOGO "${system_temp_directory}/drives.vbs"</execArgs>
      <name>drives</name>
    </setInstallerVariableFromScriptOutput>
    <foreach>
      <values>${drives}</values>
      <variables>drive</variables>
      <actionList>
        <addChoiceOptions>
          <name>targetdrive</name>
          <optionList>
            <option>
              <value>${drive}</value>
              <text>Drive ${drive}</text>
           </option>
          </optionList>
        </addChoiceOptions>
      </actionList>
    </foreach>
  </initializationActionList>
  ...
  <parameterList>
    <choiceParameter>
      <name>targetdrive</name>
      <description>Which drive?</description>
      <explanation>Disk drive to install application to</explanation>
      <value></value>
      <default></default>
      <allowEmptyValue>0</allowEmptyValue>
      <displayType>radiobuttons</displayType>
      <ordering>default</ordering>
      <width>40</width>
      <postShowPageActionList>
        <setInstallerVariable>
          <name>installdir</name>
          <value>${targetdrive}:/${project.shortName}</value>
        </setInstallerVariable>
      </postShowPageActionList>
      <validationActionList>
        <!-- Do not allow selecting a drive without write access -->
        <throwError>
          <text>Selected drive cannot be written to</text>
          <ruleList>
             <fileTest>
               <condition>not_writable</condition>
               <path>${targetdrive}:/</path>
             </fileTest>
          </ruleList>
        </throwError>
      </validationActionList>
    </choiceParameter>
    ...
    <directoryParameter>
      <name>installdir</name>
      <value></value>
      <allowEmptyValue>0</allowEmptyValue>
      <ask>0</ask>
    </directoryParameter>
  </parameterList>
</project>
Please note that the above code is hiding the regular installdir page and configuring it in the choice <postShowPageActionList> to the chosen disk drive.
Parameter Groups
A group parameter allows you to logically group other parameters. They will be presented in the same screen in GUI and text installers. You need to place the grouped parameters in a parameterList section, as shown in the example below. Please note that parameter groups also need to contain a <name> tag.
   <parameterGroup>
     <name>userandpass</name>
     <explanation>Please enter the username and password for your database.</explanation>
     <parameterList>
       <stringParameter>
         <name>username</name>
         <default>admin</default>
         <description>Username</description>
       </stringParameter>
       <passwordParameter>
         <ask>yes</ask>
         <name>masterpass</name>
         <description>Password</description>
         <descriptionRetype>Retype password</descriptionRetype>
         <explanation>Please provide a password for the database user</explanation>
         <cliOptionName>password</cliOptionName>
       </passwordParameter>
     </parameterList>
   </parameterGroup>
You can also implement more complex layouts, for example, a page to request a serial key:
 <parameterGroup>
    <name>licensekey</name>
    <title>License Key</title>
    <explanation>Please enter your registration key</explanation>
    <value></value>
    <default></default>
    <orientation>horizontal</orientation>
    <parameterList>
       <!-- A stringParameter for each field. We include a "-" as description to simulate the license-type format -->
       <stringParameter name="code1" description="" allowEmptyValue="0" width="4"/>
       <stringParameter name="code2" description="-" allowEmptyValue="0" width="4"/>
       <stringParameter name="code3" description="-" allowEmptyValue="0" width="4"/>
       <stringParameter name="code4" description="-" allowEmptyValue="0" width="4"/>
    </parameterList>
    <validationActionList>
       <foreach variables="field">
          <values>"${code1}" "${code2}" "${code3}" "${code4}"</values>
          <actionList>
             <throwError>
                <text>${field}: Field should be four digits length</text>
                <ruleList>
                    <compareTextLength text="${field}" logic="equals" length="4" negate="1"/>
                </ruleList>
             </throwError>
             <throwError>
                <text>${field}: Should be a pure digit string</text>
                <ruleList>
                    <stringTest text="${field}" type="digit" negate="1"/>
                </ruleList>
             </throwError>
          </actionList>
       </foreach>
    </validationActionList>
    <postShowPageActionList>
       <setInstallerVariable name="normalizedkey" value="${code1}${code2}${code3}${code4}"/>
    </postShowPageActionList>
    <ruleList>
        <compareText text="${installer_ui}" logic="equals" value="gui"/>
    </ruleList>
 </parameterGroup>
Please note this layout won’t be properly displayed in text mode so the example hides the page if the ${installer_ui} built-in variable is not gui (see Installation Modes for additional details). If you plan to support text mode, you should then create an additional simplified page to be displayed instead:
 <stringParameter>
    <name>licensekeytext</name>
    <title>License Key</title>
    <description>Please introduce your registration key:</description>
    <ruleList>
       <compareText text="${installer_ui}" logic="equals" value="text"/>
    </ruleList>
 </stringParameter>
Dynamic Parameter Groups
Boolean Parameter Group
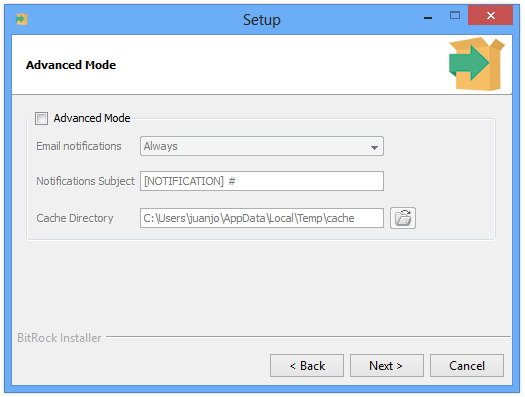
This parameter is a special <parameterGroup> that allows toggling its state through clicking a checkbox. In addition to grouping the contained parameters, the <booleanParameterGroup> also contains a <value>, like the <booleanParameter> does, that can be accessed like any other parameters. A basic example snippet would be:
<booleanParameterGroup>
<name>advanced</name>
<description>Advanced Mode</description>
<validationType>always</validationType>
<value>0</value>
<parameterList>
<choiceParameter>
<name>emailNotifications</name>
<value>always</value>
<description>Email notifications</description>
<optionList>
<option description="Always send notifications" text="Always" value="always"/>
<option description="Never send notifications" text="Never" value="never"/>
</optionList>
</choiceParameter>
<stringParameter name="subject" description="Notifications Subject" value="[NOTIFICATION] #"/>
<directoryParameter description="Cache Dir" name="cacheDir" value="${system_temp_directory}/cache"/>
</parameterList>
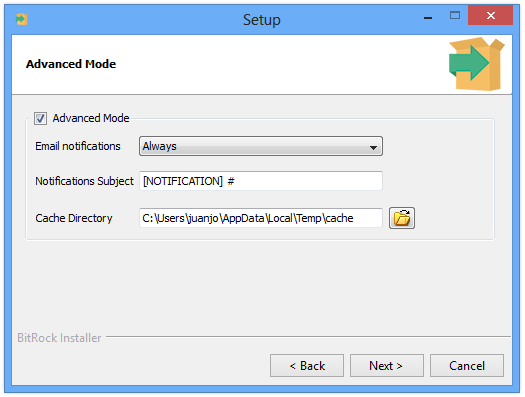
</booleanParameterGroup>The parameters in the <parameterList> will be surrounded by a frame, selectable by a checkbox. If the checkbox is deselected, the child parameters will be displayed as read only (or won’t be displayed in text mode):
Enabling the checkbox will then make the child parameters editable:
The <booleanParameterGroup> also allows specifying under which conditions their grouped parameters will execute their <postShowPageActionList> and <validationActionList> actions through the <validationType> setting. Its default value is always, which makes all of the visible child components to execute their <postShowPageActionList> and <validationActionList> actions like a regular parameter group would. This is the recommended setting when you just need the <booleanParameterGroup> to group a set of settings and allow them to be disabled so end users does not focus their attention on secondary configuration fields. For example, the example above showed a group containing some secondary settings, disabled by default. This way users will know that they do not require much attention or that they do not need to worry if they does not understand them.
In other circumstances, you won’t need the <booleanParameterGroup> only for grouping, but also to perform some actions on the provided information only if the checkbox is selected. For example, you could ask your users if they want to register the installation. In the case of the user not checking the <booleanParameterGroup> checkbox, you won’t be interested in the information contained in the child parameters or in reporting errors on its validation actions. In these cases you can set the <validationType> to ifSelected.
Take into account that, regardless of the state of the <booleanParameterGroup> or the setting configured in its <validationType>, its child will unconditionally execute its <preShowPageActionList>. The reason is that the <preShowPageActionList> is intended to be used to customize the values of the page prior to displaying it, not to perform operations on the values, which have not yet been introduced or acknowledged by the end user.
In addition, the <booleanParameterGroup> action lists are also not affected. As any other parameter, it will execute all of its actions.
The below snippet illustrates the behavior:
<booleanParameterGroup>
   <name>register</name>
   <description>Register Installation</description>
   <validationType>ifSelected</validationType>
   <value>0</value>
   <parameterList>
      <stringParameter name="username" description="User Name" allowEmptyValue="0" value=""/>
      <stringParameter name="email" description="Email" allowEmptyValue="0" value="">
         <validationActionList>
            <throwError text="The provided value does not seem an email address">
               <ruleList>
                 <regExMatch>
                   <logic>does_not_match</logic>
                   <pattern>[a-zA-Z0-9\._-]+@[a-zA-Z0-9\._-]+</pattern>
                   <text>${email}</text>
                 </regExMatch>
               </ruleList>
            </throwError>
         </validationActionList>
      </stringParameter>
      <stringParameter description="License Key" name="key" value="" allowEmptyValue="0"/>
   </parameterList>
   <validationActionList>
      <httpPost>
        <url>http://example.com/register.php</url>
        <filename>${installdir}/result</filename>
        <queryParameterList>
          <queryParameter name="name" value="${username}"/>
          <queryParameter name="email" value="${email}"/>
          <queryParameter name="license" value="${key}"/>
        </queryParameterList>
        <ruleList>
           <isTrue value="${register}"/>
        </ruleList>
      </httpPost>
      ...
   </validationActionList>
</booleanParameterGroup>
If the user checks the checkbox, the parameters will execute their validations. Please note that the code adds the registration actions to the <validationActionList> of the <booleanParameterGroup>, which are always executed. That is why it includes a rule checking its state.
Choice Parameter Group
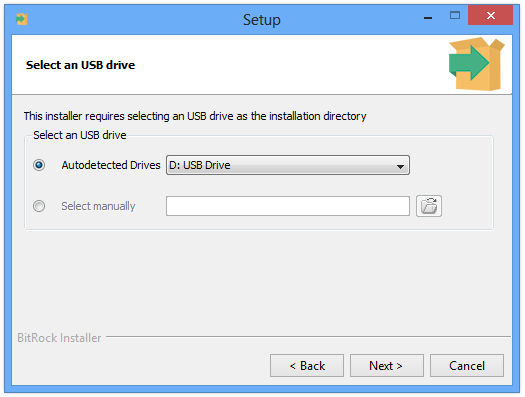
This parameter is a special <parameterGroup> that allows selecting a subset of widgets. In addition to grouping the contained parameters, the <choiceParameterGroup> also contains a <value>, like the <choiceParameter> does, that can be accessed like any other parameters. The value stored will represent the name of the selected child parameter. A basic example snippet would be:
<choiceParameterGroup>
   <name>usbLocation</name>
   <description>Select an USB Drive</description>
   <value>usbDetectedList</value>
   <parameterList>
      <choiceParameter>
         <name>usbDetectedList</name>
         <value></value>
         <description>Autodetected List</description>
         <optionList>
         </optionList>
         <preShowPageActionList>
             <addChoiceOptionsFromText>
               <name>usbDetectedList</name>
               <text>${driveInfo}</text>
             </addChoiceOptionsFromText>
         </preShowPageActionList>
      </choiceParameter>
      <directoryParameter name="customDir" description="Custom Location" value=""/>
   </parameterList>
</choiceParameterGroup>
The parameters in the <parameterList> will be surrounded by a frame. The <choiceParameterGroup> will present a radiobutton for each of its first-level child parameters, labeled with the description of the child parameter:
The <choiceParameterGroup> will execute all of its child parameters <preShowpageActionList> (to allow them to auto-reconfigure) but will only execute the <validationActionList> and <postShowPageActionList> of the selected parameter.
Similarly to the <booleanParameterGroup>, the <choiceParameterGroup> will always execute its action lists regardless of the selected child.
The default look and feel of the parameter is to show as disabled all the deselected parameters, preventing the user from editing their information until the corresponding radiobutton is selected. If you want to overwrite this behavior and make all the parameters editable regardless of the selected option, you just have to use the <unselectedOptionsBehavior> tag:
<choiceParameterGroup>
   <name>usbLocation</name>
   <description>Select an USB Drive</description>
   <unselectedOptionsBehavior>none</unselectedOptionsBehavior>
   <value>usbDetectedList</value>
   <parameterList>
      ...
   </parameterList>
</choiceParameterGroup>
Nesting
The <booleanParameterGroup> and <choiceParameterGroup> parameters, like any other parameter, can be grouped, either using a regular <parameterGroup> or another <booleanParameterGroup> or <choiceParameterGroup>.
Their only limitation is that they cannot configure their orientation as regular parameterGroups do.
An example of a complex layout using nesting could be the produced using the below code:
 <booleanParameterGroup>
   <name>register</name>
   <description>Register Installation</description>
   <explanation></explanation>
   <value>1</value>
   <default></default>
   <validationType>ifSelected</validationType>
   <parameterList>
     <stringParameter>
       <name>username</name>
       <description>Username</description>
       <allowEmptyValue>0</allowEmptyValue>
       <width>40</width>
     </stringParameter>
     <passwordParameter>
       <name>password</name>
       <description>Enter password</description>
       <allowEmptyValue>0</allowEmptyValue>
       <descriptionRetype></descriptionRetype>
       <width>20</width>
     </passwordParameter>
     <stringParameter>
       <name>phone</name>
       <description>Phone</description>
       <allowEmptyValue>1</allowEmptyValue>
       <width>40</width>
       <validationActionList>
         <throwError>
           <text>The provided phone '${phone}' does not seem a valid one</text>
           <ruleList>
             <regExMatch>
               <logic>does_not_match</logic>
               <pattern>^[\d+-]*$</pattern>
               <text>${phone}</text>
             </regExMatch>
           </ruleList>
         </throwError>
       </validationActionList>
     </stringParameter>
     <choiceParameterGroup>
       <name>keyChoice</name>
       <description>Select how to provide your license key</description>
       <explanation></explanation>
       <value></value>
       <default></default>
       <parameterList>
         <fileParameter>
           <name>keyFile</name>
           <description>Load from file</description>
           <allowEmptyValue>0</allowEmptyValue>
           <mustBeWritable>0</mustBeWritable>
           <mustExist>0</mustExist>
           <width>40</width>
         </fileParameter>
         <stringParameter>
           <name>licenseText</name>
           <description>Enter license key</description>
           <allowEmptyValue>1</allowEmptyValue>
           <width>40</width>
         </stringParameter>
       </parameterList>
     </choiceParameterGroup>
   </parameterList>
 </booleanParameterGroup>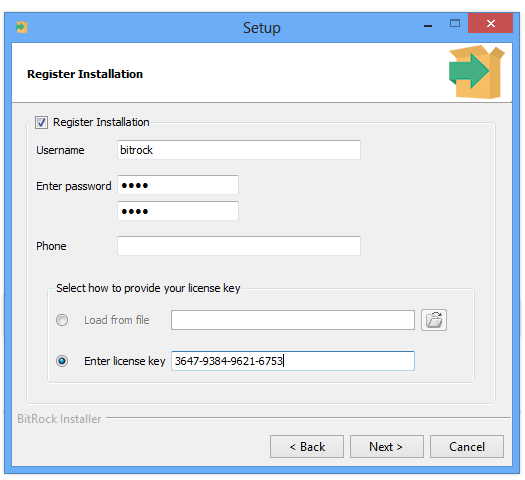
Command Line Parameters
All of the parameters in a project are mapped to command line flags and, depending on the visibility of the parameter (configured by the <ask> property,) they will be displayed in the help menu.
The name of the command line flag will default to the parameter name but, if needed, it can be configured setting by a value for its <cliOptionName> property:
    <parameterList>
       <directoryParameter>
          <name>installdir</name>
          <description>This is the description</description>
          <explanation>And here goes the explanation</explanation>
          <default>${platform_install_prefix}/${project.shortName}-${project.version}</default>
          <ask>yes</ask>
          <cliOptionName>prefix</cliOptionName>
       </directoryParameter>
       <!-- Will Not be displayed in help menu -->
       <stringParameter name="secretFlg" value="" ask="0"/>
    </parameterList>
Even if a parameter is configured as hidden by setting its <ask> property to 0, it will be accessible by the command line interface; it will just not be visible to the end user. Hidden parameters are very useful because they can be used as permanent variables that can be reconfigured when launching the installer. A good example would be to disable license validation when testing:
    <parameterList>
       <stringParameter>
          <name>license</name>
          <description>License Registration Page</description>
          <explanation>Please introduce you license number</explanation>
          <ask>yes</ask>
          <ruleList>
              <isTrue value="${validateLicense}"/>
          </ruleList>
       </stringParameter>
       <!-- Will Not be displayed in help menu -->
       <booleanParameter name="validateLicense" value="1" ask="0"/>
    </parameterList>
To avoid having to introduce the license number each time you launch the installer, you just have to disable the page when launching the installer:
$> myInstaller.run --validateLicense 0Although the <ask> property allows us to configure whether or not a page is displayed through the installation process and in the help menu, there are some scenarios in which it is desirable to show the associated command line flag while permanently hiding the page at runtime. This can be achieved by attaching a rule to the page:
    <parameterList>
       <stringParameter>
          <name>create_shortcuts</name>
          <description>Create shortcuts</description>
          <explanation>Whether to create or not shortcuts to the application</explanation>
          <ask>yes</ask>
          <ruleList>
              <isTrue value="0"/>
          </ruleList>
       </stringParameter>
    </parameterList>
As you have set ask="1", the command line flag is visible through the help menu but at runtime, when the rule attached is evaluated, it will not be displayed.
|
Note
|
If a page is not displayed, its associated actions are not executed
Independently of whether the page is hidden through a rule or by setting |
Option Files
As explained in the previous section, the values of the installer parameters can be configured by passing command line options. However, when a large number of parameters must be configured, there is a more convenient way to do so using an option file.
An option file is just a .properties file containing all of the parameters to configure:
prefix=/tmp
validateLicense=0
installDocumentation=1
...
This file can be passed to the installer using the --optionfile command line flag:
$> myInstaller.run --optionfile path/to/configuration.optionsAnother way of providing the option file is to create a file in the same directory as the installer with the same name plus the .options suffix:
$> ls some/output/directory
$> myInstaller.run
$> myInstaller.run.options
In both cases, the installer will parse the file and will map all the entries to internal parameters. Lines starting with a first non-blank # character will be treated as comments.