Introduction to InstallBuilder
InstallBuilder is a modern, fully-featured, cross-platform installation tool. It is designed to simplify the deployment of both desktop and server software, helping you reduce support costs related to installation and provide a positive end-user experience.
This document provides an overview of InstallBuilder capabilities and architecture, as well as in-depth coverage of common installation topics. A companion appendix provides detailed information on each one of the XML configuration options.
What Sets InstallBuilder Apart
To fully understand the architecture and capabilities of InstallBuilder, it is useful to consider the previous generation of cross-platform installers. These were built using the Java programming language. Java is a fine choice for multiple scenarios and indeed over half of your users use InstallBuilder to package Java-based applications. However, it has a set of major drawbacks when the goal is to create setup programs. For example, it requires a Java runtime environment to be present in the machine, which increases the chances of something going wrong if one is not present or the one present is not a suitable version. Alternatively, if the user decides to bundle a JRE with the installer in order to avoid these potential problems, it will increase significantly the footprint of the installation. Java-based installers also require a self-extraction step, in which the files are first unpacked to disk before installation can begin. For large installers, this can be a time-consuming step and another source of installation-related issues if the end-user runs out of disk space during this process. Finally, and although alternative toolkits like SWT finally emerged, Java GUI development has traditionally suffered from poor performance and lack of a truly native look-and-feel. End-users react much more favorably to setup applications that are responsive and provide a familiar native interface, even if the functionality is identical.
The above is not intended as a rant against Java-based installers, rather as an illustration of the challenges that a cross platform installation tool faces. So, how does InstallBuilder address these issues? Installers generated with InstallBuilder are native applications that do not require any runtime to be present in the system to run. This means that the overhead the installer introduces is very small, typically around 2 to 3 Mb, versus the 15 Mb to 20 Mb that a bundled JRE requires. In addition to this, the installers do not perform a self-extraction step, meaning that they start up instantaneously, whereas some Java-based installers can take up to minutes to initialize for large installers. Installers created with InstallBuilder use the underlying system libraries for displaying their GUI interfaces, so users get a native look and feel for each platform the installers run on, such as Windows and Mac OS X. On Linux and other Unix platforms, there is not a single standard look and feel. In those cases, InstallBuilder provides a choice between the most common toolkits, Qt and GTK, as well as a built-in fallback mode.
What’s New In InstallBuilder 26
InstallBuilder 26 provides a host of new features, including:
-
Multi-core installer creation: InstallBuilder can take advantage of multiple cores/threads in LZMA and LZMA Ultra compression
-
Multi-core decompression: Significantly faster file unpacking by using up to 8 cores/threads for LZMA and LZMA Ultra compressions
-
Installation time performance improvements: Multiple changes in file management provide up to 20% speed increase for large installers
-
Support for cross-platform installer signing: Signing installers for both Windows and Mac OS X can now be done from any platform
Features
InstallBuilder is a fully-featured tool capable of addressing multiple installation scenarios, from desktop games to engineering simulation tools to enterprise-level server software.
-
Multiplatform Support: InstallBuilder installers are native binaries that can run on Windows, OS X and Linux and most other flavors of Unix, including FreeBSD, OpenBSD, AIX, OS/400, HP-UX and IRIX.
-
Desktop Integration: InstallBuilder installers provide native look and feel and desktop integration for Windows, OS X and Linux (KDE and Gnome).
-
Optimized: InstallBuilder installers are optimized in size and speed and do not require a self-extraction step, reducing download, startup and installation time. Built-in LZMA support provides great compression ratios.
-
No External Dependencies: InstallBuilder installers are single-file, self-contained native executables with no external dependencies and minimal overhead. Unlike competing products, all InstallBuilder installers are truly native code and do not require bundling a Java Runtime Environment.
-
Ease of Use: InstallBuilder installers provide an intuitive and easy to use interface on all platforms, even for end users without previous Linux experience.
-
Ease of Development: InstallBuilder includes an easy to learn, easy to use GUI environment. Design, build and test installers with the click of a button.
-
Time Saving Functionality: For advanced users, a friendly XML project format supports source control integration, collaborative development and customizing projects both by hand and using external scripts. A command line interface allows you to automate and integrate the building process. QuickBuild functionality allows you to update installers in a few seconds, without having to repack the entire application.
-
Built-in Actions: InstallBuilder provides convenient built-in actions for commonly required installation functionality such as auto-detecting a Java(tm) Runtime, changing file permissions and ownership, substituting text in a file, adding environment variables, adding directories to the path, creating symbolic links, changing the Windows registry, launching external scripts and so on.
-
Crossplatform Build Support: The installer builder tool can run on Windows, Mac OS X, Linux and all other supported Unix platforms and generate installers for all target platforms from a single project file. Create all your installers from a single build environment!
-
Customization: InstallBuilder installers can be customized in a variety of ways, both graphically and in functionality. It is possible to ask for multiple parameters, like username and passwords, in the same installer screen. This functionality helps to simplify the installation process for end-users.
-
Multiple Installation Modes: InstallBuilder installers provide: several GUI modes with native look-and-feel, for installation in a variety of desktop environments, a text-based installation mode, for console-based and remote installations, and a silent/unattended install mode which can be used for integration in shell scripts for automated deployment.
-
Support for Qt® GUI Frontend: The InstallBuilder for Qt family of products provides a GUI installation mode using the Qt crossplatform toolkit, enhancing the end-user experience
-
Rollback Functionality: InstallBuilder installers by default perform a backup of all the files overwritten during installation, so if there is an error, the system can be recovered to its previous state.
-
Native Package Integration: InstallBuilder installers can register your software with the RPM package database, combining the ease of use of an installer wizard with the underlying native package management system.
-
RPM and DEB generation: In addition to creating native executables that can register with the RPM subsystem, InstallBuilder can generate self-contained RPM and Debian packages that can be installed using the native package management tools.
-
Uninstall Functionality: An uninstall program is created as part of every installation, allowing users to easily uninstall the software. Like the installers, it can be run in a variety of modes. On Windows, uninstall functionality can also be accessed from the Add/Remove Programs entry in the Control Panel.
-
Startup Failure Detection: InstallBuilder installers will automatically and gracefully detect the best installation mode available. Users also have the option to manually select a mode.
-
Language and Platform Independent: InstallBuilder installers can install applications written in any language, including: Java, PHP, Perl, Python, Ruby, C/C++ and .NET/Mono.
-
Multiple Language Support: InstallBuilder installers support a variety of installation languages, including English, German, Japanese, Spanish, Italian, French, Portuguese, Traditional Chinese, Dutch, Polish, Valencian, Catalan, Estonian, Slovenian, Romanian, Hungarian, Russian and Welsh. Installers in Qt mode support right to left languages such as Arabic. The full list can be found in the Languages section. You can specify a default language or let the user decide. Please contact us if you require additional language support.
Supported Platforms
InstallBuilder provides support for all common (and not so common!) operating systems out there. If you want to know if InstallBuilder supports a particular platform, please contact us - chances are that it does. InstallBuilder-generated installers will run on:
-
Windows XP, 2003, 2008, Vista, Windows 7, Windows 8, Windows 8.1, Windows 10, Windows 11
-
Mac OS X (PPC, Intel and ARM) 10.2 and later
-
Linux (Intel x86/x64, Itanium, s390 and PPC) All distributions and version including Ubuntu, RHEL, SLES and Meego.
-
Solaris (Intel and Sparc) 8, 9, 10, 11
-
HP-UX (PA-RISC, Itanium)
-
FreeBSD 4.x and later
-
OpenBSD 3.x and later
-
AIX 4.3 and later
-
OS/400
-
IRIX 6.5
Requirements
The command line builder tool will run on any of the supported platforms, allowing you to generate installers for any of the other supported platforms for the InstallBuilder edition you are using. For example, if you are running InstallBuilder Professional on Linux, you will be able to generate installers for Windows, Linux and OS X. This is particularly useful for situations in which you need to build the installers as part of a continuous integration/daily build scenario.
The GUI installer design tool helps you to visually create installation projects. The GUI design tool runs on Linux x86/x64, OS X and Windows with a minimum of 800x600 screen resolution. Note that you can always edit XML projects directly or even alternate between using the GUI and editing the XML project file as needed.
Editions
InstallBuilder is distributed in multiple editions, with the primary differentiation being the supported platforms that you can create installers for. The link below provides a detailed comparison of the available editions:
The GUI
InstallBuilder allows projects to be created and edited with an easy to use graphical editor tool. Adding new actions to the installation logic or files to pack is as easy as double-clicking the appropriate element and navigating through the organized dialogs. The GUI is only available on Linux x86/x64, Windows and OS X.
Once the GUI is launched, you will be welcomed with the screen displayed in Figure 1. From this main screen you can use the top menu entries to create a new project or open an existing one, launch the build process, check for an updated version of InstallBuilder, register your copy of the tool and open the documentation.
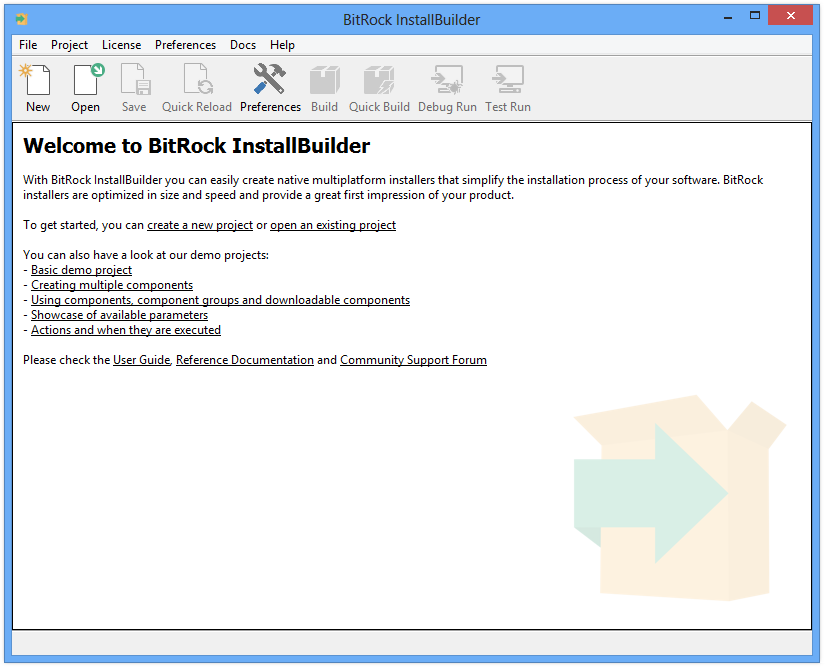
Alternatively, you can use the shortcut buttons to perform the most common actions:
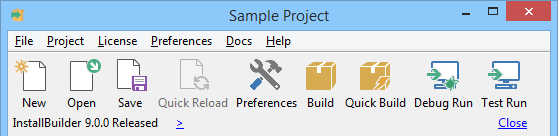
Some of the toolbar buttons will be disabled depending on whether a project is loaded or not. Figure 2 also shows the notification you
will see when a new version is available. If the builder has access to the Internet and is configured to check for updates, it will automatically report
these notifications for each new version released. The process can also be manually triggered using the Update menu. Clicking on the blue arrow will open
the downloads page in a web browser.
|
Note
|
Disabling checking for new versions of InstallBuilder
If you do not want the installer to check for updates on startup, you can edit the |
After loading or creating a new project, a new UI will appear, divided in different sections:
-
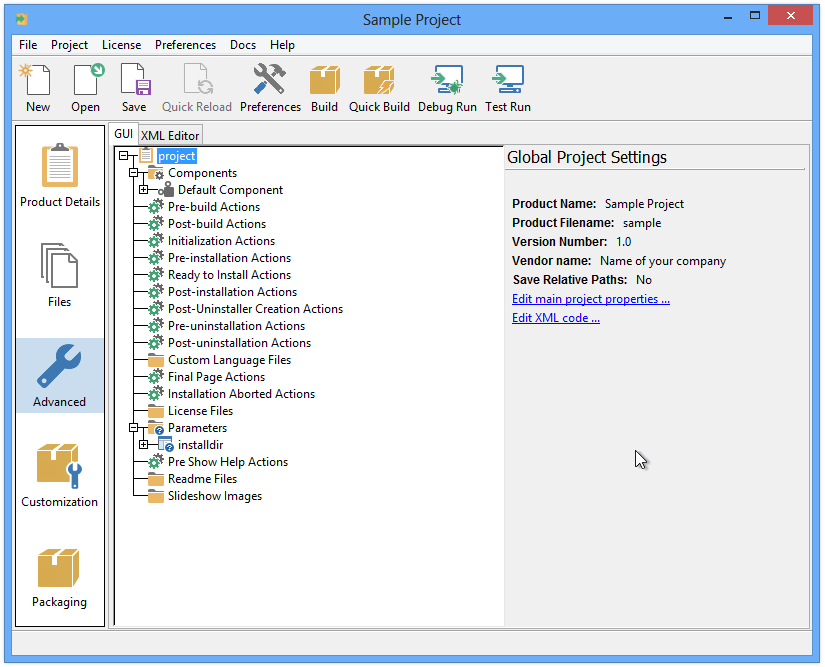
Product Details: This section presents a quick overview of the basic configuration settings for the project (Figure 3).
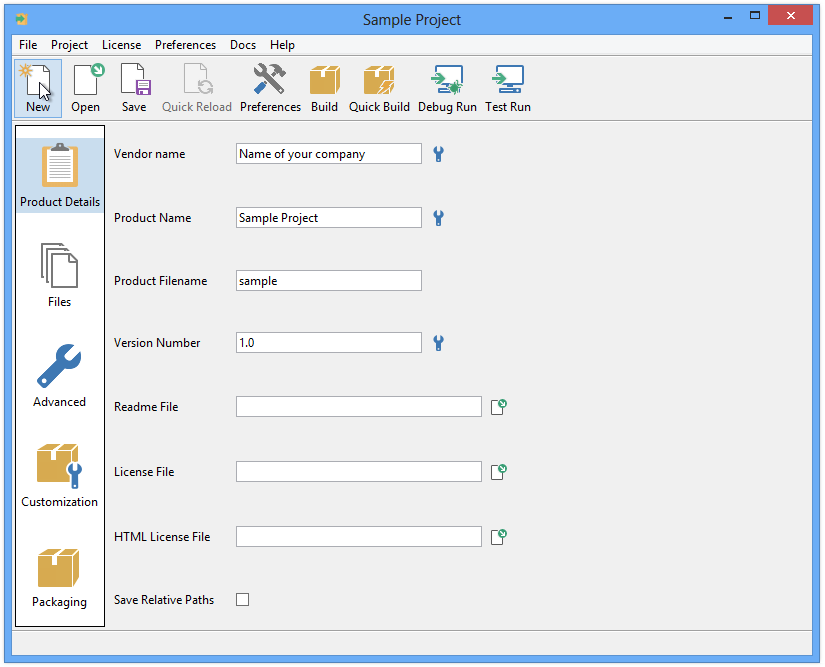
The main project settings Vendor name, Product Name, Product Filename and Version Number are defined once and used multiple times when displaying information during the installation process; in the Add/Remove Program menu, the installer filename and so on. It is always possible to override these default values when necessary.
Enabling Save Relative Paths will convert all of the absolute paths related to the build process (files to pack, images, readme…) to relative paths, using the location of the project file as the reference. This setting will be applied automatically and transparently when saving and loading the project so it will not be noticeable while working in the GUI. This particular setting is especially useful when sharing a project between developers or operating systems, as the location of the resources is not hardcoded, as explained in theWhen is it necessary to use the Save Relative Paths option? note. If the paths were already manually configured as relative, they will be preserved and resolved when building, also using the location of the project to absolutize them.
The License File setting specifies a license file that will be displayed during installation. The end user will need to accept this license text before continuing with the installation process. If you do not provide a license file, the license acceptance screen will not be displayed to the end user.
You can also provide an alternate HTML License File. This HTML-formatted license will be used if the front-end supports it (currently only the case for the Qt front-end). Otherwise the default license text specified in the License File setting will be displayed.
You can also display multiple licenses in different languages or display them conditionally, as described in the Displaying a localized license and readme section.
-
Files: This section allows managing all of the resources included in the project such as files to pack, and shortcuts to create. These resources are organized in components, designed to group common functionalities, and files, which are divided into folders (Figure 4).
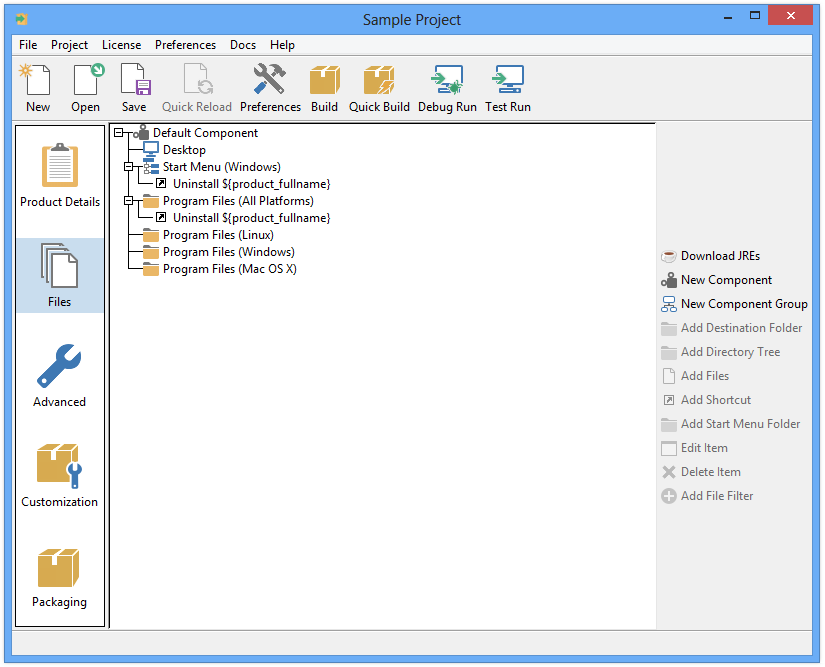
Shortcuts may also be added in this section.
-
Advanced: The same way the Files section specifies the resources that will be packaged, the Advanced section deals with the configuration of the actions and rules associated with them (Figure 5). It also allows you to describe the inputs that the installer will accept and the pages to display at runtime to interact with the end user. The nodes in the tree can also be reordered, moved (you can drag and drop them) and copied (press shift while performing a drag and drop operation). In addition, the root node, representing the project, allows configuring the global project properties.
-
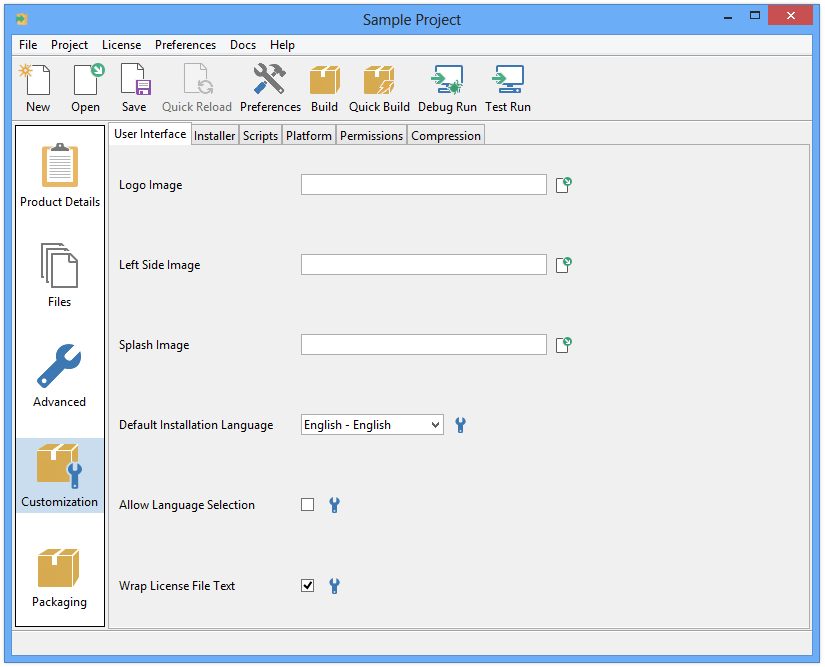
Customization: The Customization section (Figure 6) provides a convenient way to configure the most common project properties. It is a subset of the properties available in the Advanced tab.
-
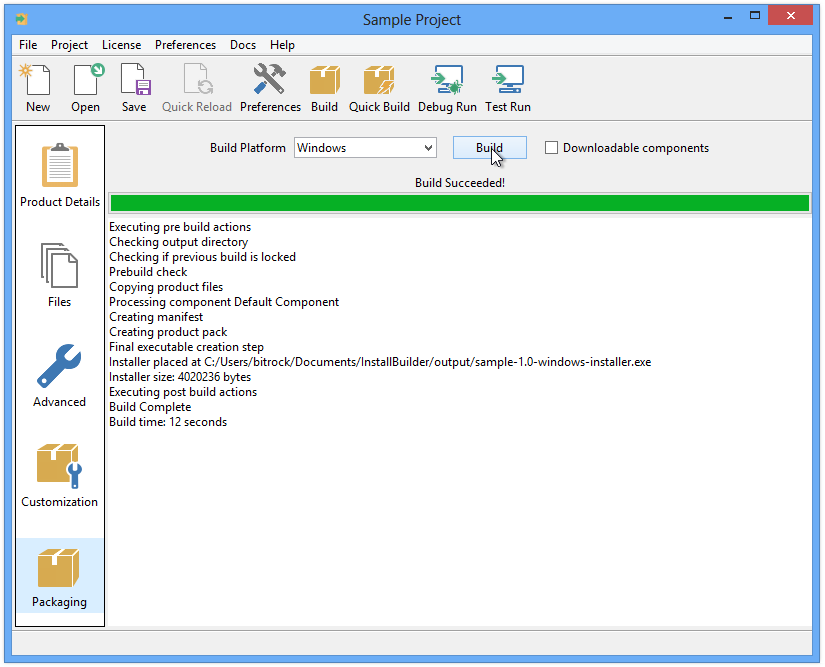
Packaging: This section allows you to specify the target platform for which you want to build the installer. It provides a log of the build process, including a progress bar and displaying build-errors in red when they occur (Figure 7).
|
Note
|
The GUI is only available on Linux, Linux x64, Windows and OS X. The command line builder is available on all platforms. |
The XML
InstallBuilder project files are stored in XML format. This enables and simplifies source control integration, collaborative development and customizing projects both by hand and using external scripts.
Our XML is human friendly, and although the project can be fully managed through the GUI, advanced users can also directly edit the XML project using the built-in XML editor or their preferred text editor or IDE. The following is a complete example of what an InstallBuilder project looks like. This particular project does not package any files.
<project>
    <shortName>sample</shortName>
    <fullName>Sample Project</fullName>
    <version>1.0</version>
    <enableRollback>1</enableRollback>
    <enableTimestamp>1</enableTimestamp>
    <componentList>
        <component>
            <name>default</name>
            <description>Default Component</description>
            <canBeEdited>1</canBeEdited>
            <selected>1</selected>
            <show>1</show>
            <folderList>
                <folder>
                    <description>Program Files</description>
                    <destination>${installdir}</destination>
                    <name>programfiles</name>
                    <platforms>all</platforms>
                    <shortcutList>
                        <shortcut>
                            <comment>Uninstall</comment>
                            <exec>${installdir}/${project.uninstallerName}</exec>
                            <icon></icon>
                            <name>Uninstall ${project.fullName}</name>
                            <path>${installdir}</path>
                            <platforms>all</platforms>
                            <runAsAdmin>0</runAsAdmin>
                            <runInTerminal>0</runInTerminal>
                            <windowsExec>${installdir}/${project.uninstallerName}.exe</windowsExec>
                            <windowsExecArgs></windowsExecArgs>
                            <windowsIcon></windowsIcon>
                            <windowsPath>${installdir}</windowsPath>
                        </shortcut>
                    </shortcutList>
                </folder>
            </folderList>
            <startMenuShortcutList>
                <startMenuShortcut>
                    <comment>Uninstall ${project.fullName}</comment>
                    <name>Uninstall ${project.fullName}</name>
                    <runAsAdmin>0</runAsAdmin>
                    <runInTerminal>0</runInTerminal>
                    <windowsExec>${installdir}/${project.uninstallerName}.exe</windowsExec>
                    <windowsExecArgs></windowsExecArgs>
                    <windowsIcon></windowsIcon>
                    <windowsPath>${installdir}/</windowsPath>
                </startMenuShortcut>
            </startMenuShortcutList>
        </component>
    </componentList>
    <parameterList>
        <directoryParameter>
            <name>installdir</name>
            <description>Installer.Parameter.installdir.description</description>
            <explanation>Installer.Parameter.installdir.explanation</explanation>
            <value></value>
            <default>${platform_install_prefix}/${project.shortName}-${project.version}</default>
            <allowEmptyValue>0</allowEmptyValue>
            <ask>yes</ask>
            <cliOptionName>prefix</cliOptionName>
            <mustBeWritable>yes</mustBeWritable>
            <mustExist>0</mustExist>
            <width>30</width>
        </directoryParameter>
    </parameterList>
</project>
Most of the examples presented in this guide are provided as XML snippets, but you can achieve identical functionality using the GUI
XML Schema
If your XML editor supports it, you can use a RELAX NG schema for validation. It is included as InstallBuilder.rng, inside the docs directory of your installation.
For Atom you can use the linter-autocomplete-jing package. This package allows autocompletion of XML documents against RELAX NG.

To set up the XML schema with Visual Studio Code you can use trang to convert the RNG file to the XSD format. and using the XML Language Support extension you can add it to your settings.json in the following way:
    "xml.fileAssociations":[{
        "systemId": "/path/to/installbuilder/docs/InstallBuilder.xsd",
        "pattern": "**/*.xml"
       },
       {
        "systemId": "https://www.w3.org/2001/XMLSchema.xsd",
        "pattern": "**/*.xsd"
       }]
Escaping special characters
The XML specification requires that specific characters are escaped. This is done automatically if entering the values through the GUI but if you are directly editing the XML code you must take it into account. The table below summarizes the most common characters and their escape sequence:
| Character | XML escaped sequence |
|---|---|
& |
|
< |
|
> |
|
' |
|
" |
|
\n |
|
Some of the values only need to be escaped if provided as part of an attribute value, not an element.
The snippet below adds some lines to an existing file, separating them using escaped line breaks (\n):
<addTextToFile>
<file>${installdir}/foo.txt</file>
<text>line1
line2
line3</text>
</addTextToFile>It is also possible to escape a full block of code using the <![CDATA[ .. ]]> notation
  <writeFile>
    <path>${installdir}/${project.vendor}-x-my-mime.xml</path>
    <text><![CDATA[
<?xml version="1.0"?>
<mime-info xmlns='http://www.freedesktop.org/standards/shared-mime-info'>
  <mime-type type="application/x-my-mime">
    <comment>My new file type</comment>
    <glob pattern="*.mymime"/>
  </mime-type>
</mime-info>
 ]]></text>
  </writeFile>
The text inside the <![CDATA[ .. ]]> block will be interpreted literally, so you do not need to escape any character.