Code Signing
OS X
Starting with OS X 10.8, Apple has tightened its security policies through the inclusion of "Gatekeeper". This new feature is intended to protect users from malicious software by only allowing applications from the Apple Store or signed by a registered Apple Developer to be installed. This security policy (the default one) can be relaxed to allow any application to be installed but the process is not straightforward and most users are not willing to do that.
Even though OS X has made it mandatory to sign your installers, InstallBuilder offers a way to make this process easy.
The first step in the process is to become a registered Apple Developer and request a signing certificate. You can follow the steps to request and install your certificates in the Apple Documentation: developer.apple.com/library/mac/. After installing your certificate, you can proceed to integrate it into the build process.
InstallBuilder supports two modes of signing OS X installers. When building on OS X, if you provide the <osxSigningIdentity> setting, the builder will try to use the installed codesign tool in the system. If you are building on a different platform, or the builder fails to validate the provided signing identity, it will check if <osxSigningPkcs12File> is provided, and use the built in signing mechanism, not dependent on installed tools, if it is.
As as summary, on OS X, <osxSigningIdentity> takes precedence over <osxSigningPkcs12File>, and is completely ignored in other supported platforms (Windows and Linux).
Built-in signing code
When providing the <osxSigningPkcs12File> setting, InstallBuilder will use its multiplatorm built-in signing mechanism. The advantage of this mode of operation is that it allows building and signing your OS X installers in any of the supported platforms: Linux, OS X and Windows. You could even combine it with the Native codesign Mode so the builder will use it on OS X and fallback to the built-in mode on the rest of platforms.
To enable it, you just need to provide the path to the PKKS#12 file containing your signing certificate (check How to export your signing certificate as a PKCS#12 file for a detailed explanation about how to get it from your Keychain):
<project>
   ...
   <osxSigningPkcs12File>${build_project_directory}/osx-signing.p12</osxSigningPkcs12File>
   ...
</project>
When building, the builder will prompt you to enter the password to unlock the PKCS#12 file, and sign the installer. You could also provide the password through the <osxSigningPkcs12Password> tag.
<project>
   ...
   <osxSigningPkcs12File>${build_project_directory}/osx-signing.p12</osxSigningPkcs12File>
   <osxSigningPkcs12Password>somEPa55woRd!</osxSigningPkcs12Password>
   ...
</project>
However, providing the hardcoded password is discouraged. This method is intended to ease the automation of the process, for example, providing the password as an environment variable. For example, if you define an environment variable OSX_SIGNING_PASSWORD with the value of your password, you could then use the below code:
<project>
   ...
   <osxSigningPkcs12File>${build_project_directory}/osx-signing.p12</osxSigningPkcs12File>
   <osxSigningPkcs12Password>${env(OSX_SIGNING_PASSWORD)}</osxSigningPkcs12Password>
   ...
</project>
The builder will then use the value instead of asking you to enter the password interactively. If then you try to build without defining the variable, the builder will simply ask for it.
Finally, you can also configure whether or not to timestamp the signature and which server to use using the <osxSigningTimestampServer> tag. OS X signatures are timestamped by default so its default value is set to http://timestamp.apple.com/ts01 even if no value is provided but you could set it any other server supporting RFC 3161 standard:
<project>
   ...
   <osxSigningPkcs12File>${build_project_directory}/osx-signing.p12</osxSigningPkcs12File>
   <osxSigningPkcs12Password>${env(OSX_SIGNING_PASSWORD)}</osxSigningPkcs12Password>
   <osxSigningTimestampServer>http://timestamp.example.org/req</osxSigningTimestampServer>
   ...
</project>
Or even disable it by emptying it:
<project>
   ...
   <osxSigningPkcs12File>${build_project_directory}/osx-signing.p12</osxSigningPkcs12File>
   <osxSigningPkcs12Password>${env(OSX_SIGNING_PASSWORD)}</osxSigningPkcs12Password>
   <osxSigningTimestampServer></osxSigningTimestampServer>
   ...
</project>
How to export your signing certificate as a PKCS#12 file
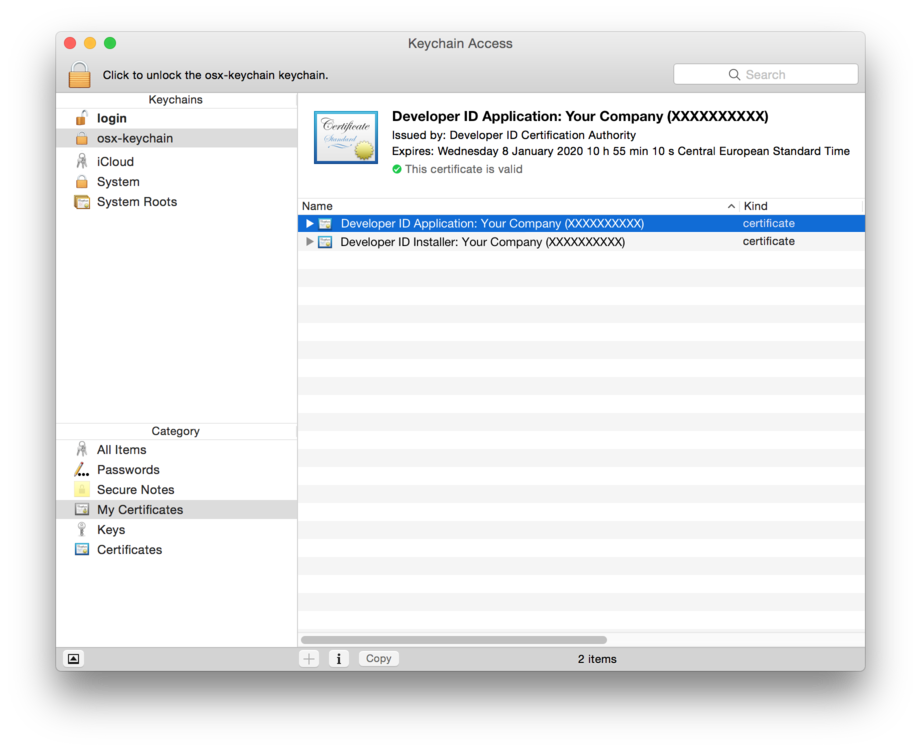
The first step will be to locate your signing certificate on the Keychain Access application. If you did not create a separated keychain for it, it will be typically located in your login keychain. The certificate to export should be named similar to Developer ID Application: Your Company (XXXXXXXXXX), where the string between the parentheses will be your Team ID. You may also have another certificate named Developer ID Installer: Your Company (XXXXXXXXXX) but we are not interested in that one.

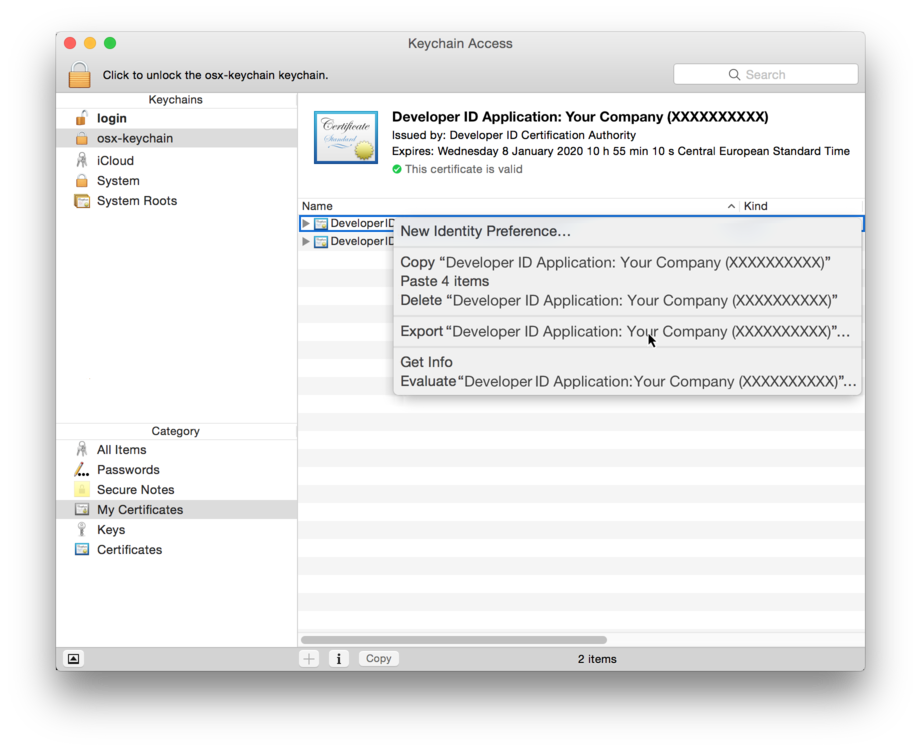
Right-click on the Developer ID Application certificate and select Export from the contextual menu:

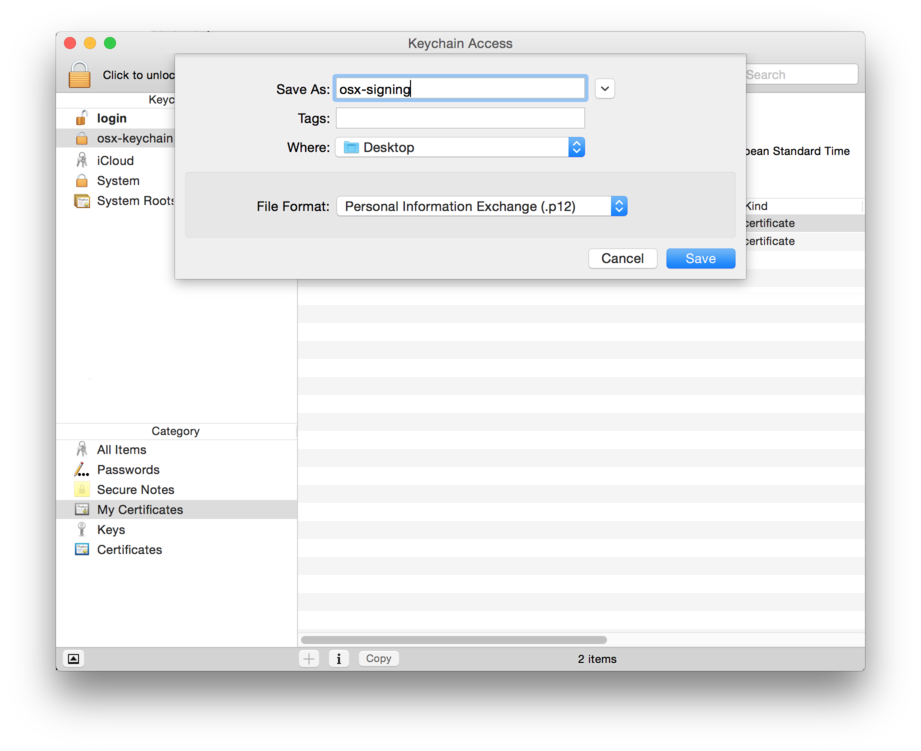
In the new popup, make sure you select "Personal Information Exchange (.p12)" as the file format, select a path to save it, and click save:

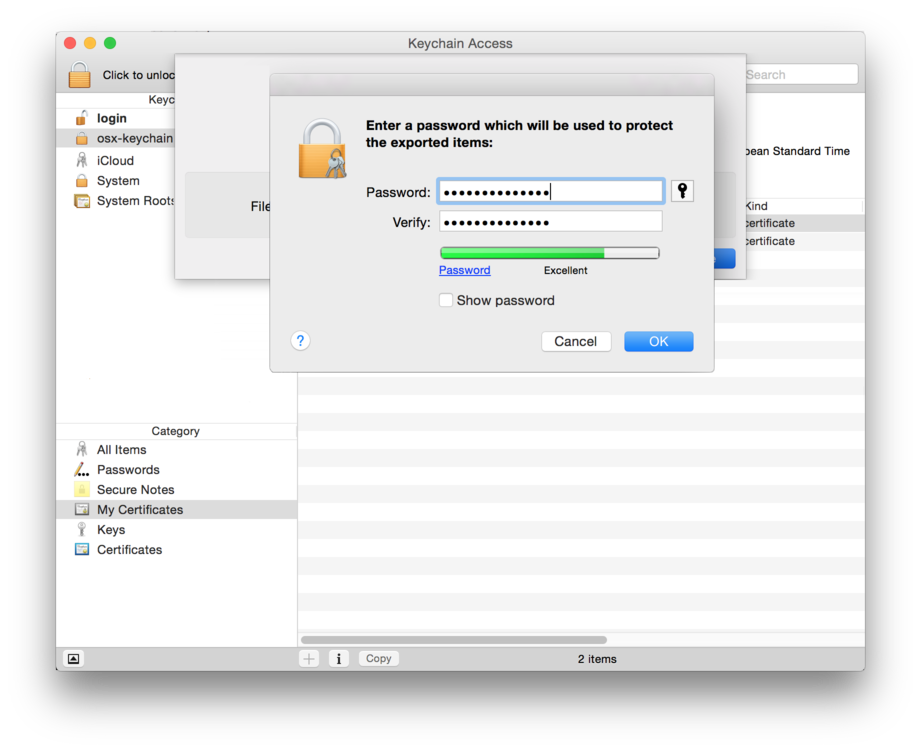
You will now be prompted to enter a new password for the exported PKCS#12 file. This password will protect your signing certificate and private key so you should select a strong password:

The new PKCS#12 file is now ready to be used in InstallBuilder
Native codesign mode
This mode of signing is only supported on OS X and requires a working codesign installation (with usually requires a modern Xcode plus the command line tools add-on). As this method calls codesign internally, it has the advantage of being able to adapt to future changes in the signature format by Apple (if those changes do not affect how the tool should be called). This is the recommended method if you are building on OS X.
InstallBuilder defines a set of properties to configure for the signing process. The minimum set of properties you should configure in your project is:
-
<osxSigningIdentity>: This is the "Common Name" of your Apple Developer certificate. It is usually calledDeveloper ID Application: Name of Your Company. The signing process is enabled by completing this field and is the only one truly mandatory. -
<osxApplicationBundleIdentifier>: The unique identifier of the application, formatted in reverse-DNS format. It is not required to be customized to allow the singing of your application but InstallBuilder uses the same one for all generated installers (com.installbuilder.appinstaller) so you should provide one that matches your company name and application. For example, if your company domain name isexample.com, and your application is named "Foo Bar Editor", you should usecom.example.foo-bar-editor. This identifier can be also registered using theDeveloper Certificate Utility.
<project>
   ...
   <osxSigningIdentity>Developer ID Application: Name of Your Company</osxSigningIdentity>
   <osxApplicationBundleIdentifier>com.example.foo-bar-editor</osxApplicationBundleIdentifier>
   ...
</project>
You can now launch the build process and the builder will try to sign the installer (please note that this process is only allowed on OS X). If your keychain requires a password to access your keys, you will get a dialog requesting it. After introducing it, the build process will continue.
The builder will attempt to sign all of the InstallBuilder binaries under sample.app/Contents/MacOS and the full application bundle after the <postBuildActionList>. This gives you the opportunity to modify the generated installer before the application is signed and sealed. For example, you could add a README file:
<project>
   ...
   <osxSigningIdentity>Developer ID Application: Name of Your Company</osxSigningIdentity>
   <osxApplicationBundleIdentifier>com.example.foo-bar-editor</osxApplicationBundleIdentifier>
   ...
    <postBuildActionList>
       <copyFile origin="${build_project_directory}/README" destination="${installbuilder_install_root}/output/${project.installerFilename}/Contents/Resources/"/>
    </postBuildActionList>
</project>
The signing of the bundle will be performed after copying the file so that the signature won’t be broken.
Configuring the Keychain
By default, InstallBuilder will try to locate your keys under the system keychain paths but you can also configure your project to use a custom one. This is very useful when, for example, you don’t want to install your keys on any machine and instead keep them in a safe location, such as a USB drive. To do that, use <osxSigningKeychainFile>:
<project>
   ...
   <osxSigningIdentity>Developer ID Application: Name of Your Company</osxSigningIdentity>
   <osxApplicationBundleIdentifier>com.example.foo-bar-editor</osxApplicationBundleIdentifier>
   <osxSigningResourceRulesFile>${build_project_directory}/resource-rules.plist</osxSigningResourceRulesFile>
   <osxSigningKeychainFile>/Volumes/secure/secure.keychain</osxSigningKeychainFile>
   ...
</project>
It is also recommended that you password-protect the keychain with a strong password. Note that if you are using a headless server, OS X won’t be able to show the password dialog and the process will fail:
Builder.app/Contents/MacOS/installbuilder.sh build ~/sample.xml

 Building Sample Project osx
 0% ______________ 50% ______________ 100%
 ##############################
Warning: Error signing installer: sample-1.0-osx-installer.app: User interaction is not allowed.
To resolve this, you can unlock the keychain from the command line in the <preBuildActionList>:
<project>
   ...
   <osxSigningIdentity>Developer ID Application: Name of Your Company</osxSigningIdentity>
   <osxApplicationBundleIdentifier>com.example.foo-bar-editor</osxApplicationBundleIdentifier>
   <osxSigningResourceRulesFile>${build_project_directory}/resource-rules.plist</osxSigningResourceRulesFile>
   <osxSigningKeychainFile>/Volumes/secure/secure.keychain</osxSigningKeychainFile>
   ...
   <preBuildActionList>
     <runProgram>
        <program>security</program>
        <programArguments>unlock-keychain -p '${password.password}' "${project.osxSigningKeychainFile}"</programArguments>
     </runProgram>
   </preBuildActionList>
   ...
</project>
And then launch the process as:
Builder.app/Contents/MacOS/installbuilder.sh build ~/sample.xml --setvars password='Th1s1sav3ry&5ecur3pa55w0rd!'

 Building Sample Project osx
 0% ______________ 50% ______________ 100%
 #########################################
Validating the signature
You can validate that the application was properly signed by executing the following command:
$ codesign -vvv sample-1.0-osx-installer.app
sample-1.0-osx-installer.app: valid on disk
sample-1.0-osx-installer.app: satisfies its Designated Requirement
You can also check that all of the runtimes have been signed:
$ codesign -vvv sample-1.0-osx-installer.app/Contents/MacOS/*
sample-1.0-osx-installer.app/Contents/MacOS/installbuilder: valid on disk
sample-1.0-osx-installer.app/Contents/MacOS/installbuilder: satisfies its Designated Requirement
sample-1.0-osx-installer.app/Contents/MacOS/installbuilder.sh: valid on disk
sample-1.0-osx-installer.app/Contents/MacOS/installbuilder.sh: satisfies its Designated Requirement
sample-1.0-osx-installer.app/Contents/MacOS/osx-10.2: valid on disk
sample-1.0-osx-installer.app/Contents/MacOS/osx-10.2: satisfies its Designated Requirement
sample-1.0-osx-installer.app/Contents/MacOS/osx-intel: valid on disk
sample-1.0-osx-installer.app/Contents/MacOS/osx-intel: satisfies its Designated Requirement
sample-1.0-osx-installer.app/Contents/MacOS/osx-ppc: valid on disk
sample-1.0-osx-installer.app/Contents/MacOS/osx-ppc: satisfies its Designated Requirement
You can also make sure the signed bundle is valid using the spctl tool on OS X:
$ spctl -a -t exec -vvvv sample-1.0-osx-installer.app
/Users/user/sample-1.0-osx-installer.app: accepted
source=Developer ID
origin=Developer ID Application: Name of Your Company|
Note
|
object file format unrecognized, invalid, or unsuitable
If you get this error while signing your installer you will need to upgrade your Xcode version to 4.4 and install the "Command Line Tools" add-on |
Signing an already-built installer
InstallBuilder also includes a command line tool to simplify the process of signing already-built installers. You can find it under the tools folder in the installation directory. Executing it without arguments will display the help menu:
$ tools/code-signing/osx/osxsigner

Usage:

/Applications/InstallBuilder for Qt 8.5.0/tools/code-signing/osx/osxsigner [options] /path/to/application.app


 --help                         Display the list of valid options

 --identity <identity>          Identity used to sign the application bundle
                                Default:

 --identifier <identifier>      Identifier used to sign the installer. If empty, the CFBundleIdentifier of the bundle will be used
                                Default:

 --keychain <keychain>          External keychain used to look for the identity
                                Default:

 --keychain-password <keychain-password> Password to unlock the specified keychain
                                Default:

 --output <output>              Directory in which to write the signed application. If empty, the application will be written in the same directory as the original with the '-signed' suffix appended
                                Default:

 --skip-runtimes                Just sign the Application Bundle and not the runtimes under Contents/MacOS

 --debuglevel <debuglevel>      Debug information level of verbosity
                                Default: 2
                                Allowed: 0 1 2 3 4
You can replicate the same settings used in the previous section project by executing:
$ tools/code-signing/osx/osxsigner --identity "Developer ID Application: Name of Your Company" --identifier "com.example.foo-bar-editor" \
   --keychain "/Volumes/secure/secure.keychain" --keychain-password 'Th1s1sav3ry&5ecur3pa55w0rd!' --output /tmp/signed sample-1.0-installer.app
Signing app bundle /Applications/InstallBuilder for Qt 25.3.1/output/sample-1.0-osx-installer-signed.app
Done!
Microsoft Windows
InstallBuilder is also able to sign Windows installers provided with a PKCS#12 or PFX file containing your signing certificate and keys. Windows, Linux and OS X build platforms are currently supported so you are not longer forced to use Windows to integrate the build and signing of your installers.
To use it, you just need to add the <windowsSigningPkcs12File> tag:
<project>
   ...
   <windowsSigningPkcs12File>${build_project_directory}/windows-signing.p12</windowsSigningPkcs12File>
   ...
</project>
When building, the builder will ask you to enter the password to unlock the certificate. Similarly to the built-in OS X signing, you can also provide it using the <windowsSigningPkcs12Password> tag, either by hardcoding it (NOT RECOMMENDED!) or by setting and environment variable to look for the password when building:
<project>
   ...
   <windowsSigningPkcs12File>${build_project_directory}/windows-signing.p12</windowsSigningPkcs12File>
   <windowsSigningPkcs12Password>${env(WINDOWS_SIGNING_PASSWORD)}</windowsSigningPkcs12Password>
   ...
</project>
You can also specify a timestamp server supporting RFC 3161 standard. For example, you could try tsa.safecreative.org, which allows a limited usage of 5 timestamps per day and IP:
<project>
   ...
   <windowsSigningPkcs12File>${build_project_directory}/windows-signing.p12</windowsSigningPkcs12File>
   <windowsSigningPkcs12Password>${env(WINDOWS_SIGNING_PASSWORD)}</windowsSigningPkcs12Password>
   <windowsSigningTimestampServer>http://tsa.safecreative.org</windowsSigningTimestampServer>
   ...
</project>|
Note
|
InstallBuilder and OSSLsigncode
InstallBuilder uses OSSLsigncode tool to sign Windows installers. The tool can be found in the installation directory, in the tools folder. |
Manually signing Windows Installers
If you want to further customize the signing settings, you could also call either osslsigncode tool or Microsoft signtool command-line utility (part of the Visual Studio and Windows SDK packages) in the <postBuildActionList>:
<postBuildActionList>
    <runProgram>
        <program>${installbuilder_install_root}/tools/osslsigncode/bin/osslsigncode.exe</program>
        <programArguments>-in "${installbuilder_install_root}/${project.installerFilename}" -out "${installbuilder_install_root}/signed/${project.installerFilename}" -pkcs12 certfile.pfx -readpass /path/to/passwordfile</programArguments>
    </runProgram>
</postBuildActionList>
You can find a detailed explanation about its usage in its README: https://github.com/mtrojnar/osslsigncode/blob/master/README.md
The following example shows how signtool can be used to digitally sign an installer as part of the <postBuildActionList>:
<postBuildActionList>
    <runProgram>
        <program>/path/to/signtool</program>
        <programArguments>sign /d "${project.fullName}" /f certfile.pfx  "${installbuilder_install_root}/${project.installerFilename}"</programArguments>
    </runProgram>
</postBuildActionList>
The detailed syntax of the signtool command can be found on MSDN:
A limitation of this tool is that it does not allow re-signing an installer. Therefore, performing multiple quick builds would fail, as the tool would try to sign the same installer multiple times. For testing purposes, it may be convenient to only sign the output binary if certain flag is set - such as:
<postBuildActionList>
    <runProgram>
        <program>/path/to/signtool</program>
        <programArguments>sign /d "${project.fullName}" /f certfile.pfx  "${installbuilder_install_root}/${project.installerFilename}"</programArguments>
        <ruleList>
            <isTrue value="${runSignTool}" />
        </ruleList>
    </runProgram>
</postBuildActionList>
This will only sign the binary if the runSignTool variable is set. A final build could be then run in the following way:
C:\Program Files\InstallBuilder\bin/builder-cli.exe build /path/to/project.xml windows --setvars runSignTool=1
While regular use of the builder GUI and CLI modes will not cause the target binary to be signed.
Delegating the signing to external tools
Some companies require using HSM (Hardware Security Module) or similar hardware devices to store signing keys. In these scenarios, it is not possible to export to the PKCS#12 required by the windows built-in signing. A possible solution would be to manually sign the installer in the <postBuildActionList> as explained in the previous section but that will not take care of signing the uninstaller.
A much better solution was included in version 23.7.0 using the <windowsSigningScript> tag, that allows providing an external tool of script that will take care of the signing instead of the built-in code.
<project>
    ...
    <windowsSigningScript>/path/to/your/script</windowsSigningScript>
    ...
</project>
The provided <windowsSigningScript> will be executed as:
script %input-file% %output-file%Where input-file will point to the windows binary to sign (the installer or the uninstaller) and output-file is the path where the builder will expect to find the signed version after executing script.
|
Note
|
It is the |
It is also possible to customize which arguments are passed to the script using the <windowsSigningScriptArguments> tag. To reference the %input-file% and %output-file%, you can use the special variables ${windows_signing_input_filename} (the unsigned binary) and ${windows_signing_output_filename} (the expected path where the script must write the signed version of the binary)
<project>
  ...
  <windowsSigningScript>script</windowsSigningScript>
  <windowsSigningScriptArguments>"${windows_signing_input_filename}" "${windows_signing_output_filename}"</windowsSigningScriptArguments>
  ...
</project>|
Note
|
|
|
Note
|
Delegate the signing to the bundled
osslsigncode tool |
|
Note
|
Delegate the signing to the signtool tool
As |