OS X
Packaging installers as ZIP files
OS X application bundles are merely directories with some metadata specified through the Info.plist file. Because of that, to deliver your application you must pack it somehow. InstallBuilder enables packaging the Mac OS X installer as a zip archive.
In order to use this functionality, simply enable the <createOsxBundleZip> setting in your project - such as:
<project>
    ...
    <createOsxBundleZip>1</createOsxBundleZip>
    ...
</project>
This will cause the installer to build the output app bundle, followed by packaging the app bundle in a zip file, which is stored in the same location and with the .zip prefix.
For example if your application is created as ~/Documents/InstallBuilder/output/sample-1.0-osx-installer.app, the archive will be created as ~/Documents/InstallBuilder/output/sample-1.0-osx-installer.app.zip.
The output ZIP archive will also have proper permissions set for all of the files inside the archive, so it is possible to create Mac OS X installers from any platform - including Windows.
Using DMGs to bundle your installers
The most common way used to deliver applications on OS X is using DMG files. A DMG is simply a disk image, which is mounted as separate volume when opened.
InstallBuilder allows automatically bundling your installer on Windows, OS X and Linux. However, it currently only allows basic customizations (setting the background image). If you need to further customize the DMGs and are building on OS X, you could follow the manual DMG creation section instead.
To enable this functionality, you just need to enable the <createOsxBundleDmg> setting:
<project>
    ...
    <createOsxBundleDmg>1</createOsxBundleDmg>
    ...
</project>
You can see the result in Figure 75
As previously mentioned, it is also possible to provide a background image using the <osxDmgBackgroundImage> tag. The OS X bundle will be centered based on the image dimensions:
<project>
    ...
    <createOsxBundleDmg>1</createOsxBundleDmg>
    <osxDmgBackgroundImage>${build_project_directory}/images/bitnami-clouds.png</osxDmgBackgroundImage>
    ...
</project>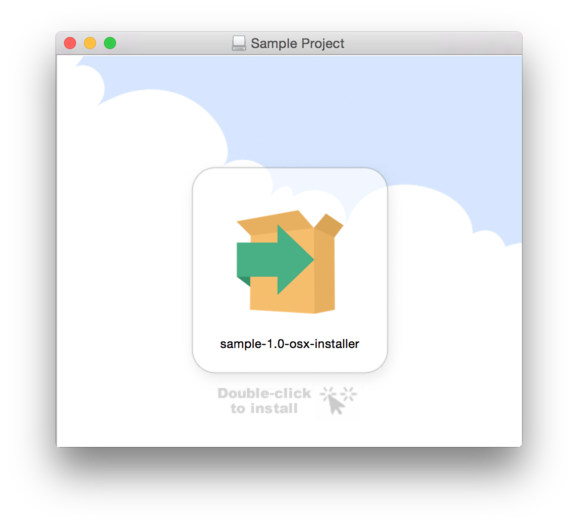
The DMG title can be configured through the <osxDmgTitle> tag:
<project>
    ...
    <osxDmgTitle>New DMG title</osxDmgTitle>
    ...
</project>
If no value is provided, it will default to the project full name.
Manual DMG creation
Although InstallBuilder built-in DMG creation is really easy to use, sometimes you will require to further customize the generated DMGs. In those case, if you are creating your installers on OS X, you could use the below code to automatically create your DMG file in the <postBuildActionList>:
<project>
...
<postBuildActionList>
<createTimeStamp>
<format>%Y%m%d%H%M%S</format>
<variable>timestamp</variable>
</createTimeStamp>
<setInstallerVariable>
<name>tempDir</name>
<value>/tmp/.tmpDir${timestamp}</value>
</setInstallerVariable>
<setInstallerVariable>
<name>dmgName</name>
<value>${installbuilder_install_root}/output/${project.installerFilename}.dmg</value>
</setInstallerVariable>
<setInstallerVariable>
<name>tempDmgFile</name>
<value>${tempDir}/tmp.dmg</value>
</setInstallerVariable>
<deleteFile>
<path>${installbuilder_install_root}/output/${project.installerFilename}.dmg</path>
</deleteFile>
<deleteFile>
<path>${tempDir}</path>
</deleteFile>
<createDirectory>
<path>${tempDir}/output</path>
</createDirectory>
<copyFile>
<destination>${tempDir}/output</destination>
<origin>${installbuilder_install_root}/output/${project.installerFilename}</origin>
</copyFile>
<runProgram>
<program>hdiutil</program>
<programArguments>create -srcfolder "${tempDir}/output" -volname "${project.fullName}" -fs HFS+ -fsargs "-c c=64,a=16,e=16" -format UDRW "${tempDmgFile}"</programArguments>
</runProgram>
<runProgram>
<program>hdiutil</program>
<programArguments>convert "${tempDmgFile}" -format UDZO -imagekey zlib-level=9 -o "${dmgName}"</programArguments>
</runProgram>
<deleteFile>
<path>${tempDir}</path>
</deleteFile>
</postBuildActionList>
...
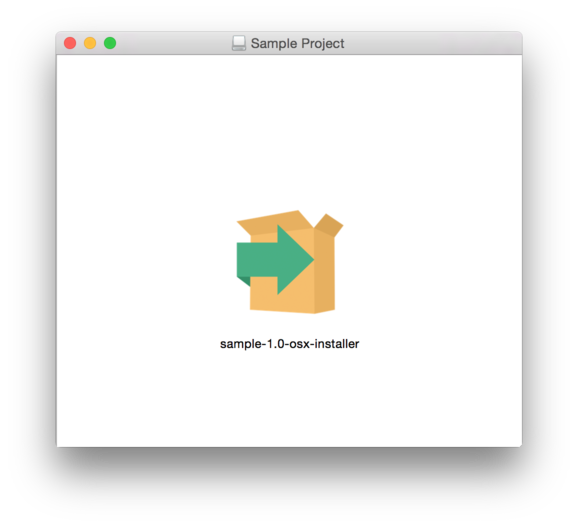
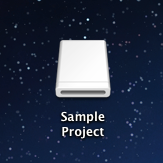
</project>Now you can test the generated DMG file by doubleclicking on it under the output directory:
A new volume will appear in your desktop:
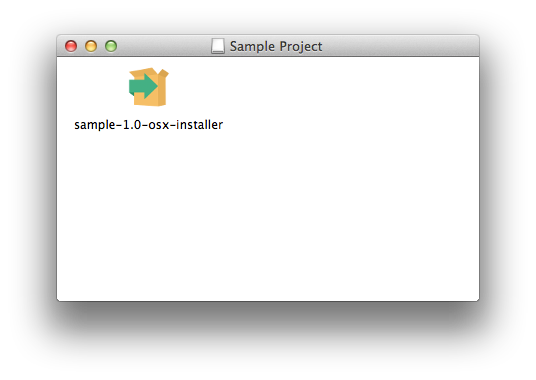
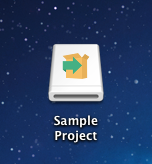
The new volume uses the default icon. If you have seen other commercial sofware DMGs, they usually display a customized volume icon, that is also possible with InstallBuilder. You will just need to create the appropriate icns file (dmg-icon.png in our example, placed in the folder images in ur project directory) and use the updated version of the code:
<project>
   ...
   <postBuildActionList>
        <createTimeStamp>
            <format>%Y%m%d%H%M%S</format>
            <variable>timestamp</variable>
        </createTimeStamp>
        <setInstallerVariable>
            <name>tempDir</name>
            <value>/tmp/.tmpDir${timestamp}</value>
        </setInstallerVariable>
        <setInstallerVariable>
            <name>dmgName</name>
            <value>${installbuilder_install_root}/output/${project.installerFilename}.dmg</value>
        </setInstallerVariable>
        <setInstallerVariable>
            <name>tempDmgFile</name>
            <value>${tempDir}/tmp.dmg</value>
        </setInstallerVariable>
        <deleteFile>
            <path>${installbuilder_install_root}/output/${project.installerFilename}.dmg</path>
        </deleteFile>
        <deleteFile>
            <path>${tempDir}</path>
        </deleteFile>
        <createDirectory>
            <path>${tempDir}/output</path>
        </createDirectory>
        <createDirectory>
            <path>${tempDir}/mnt</path>
        </createDirectory>
        <copyFile>
            <destination>${tempDir}/output</destination>
            <origin>${installbuilder_install_root}/output/${project.installerFilename}</origin>
        </copyFile>
        <actionGroup>
            <actionList>
              <copyFile>
                 <destination>${tempDir}/output/.VolumeIcon.icns</destination>
                 <origin>${build_project_directory}/images/dmg-icon.png</origin>
              </copyFile>
              <runProgram>
                 <program>SetFile</program>
                 <programArguments>-c icnC "${tempDir}/output/.VolumeIcon.icns"</programArguments>
              </runProgram>
            </actionList>
            <ruleList>
                 <fileExists path="${build_project_directory}/images/dmg-icon.png"/>
            </ruleList>
        </actionGroup>
        <runProgram>
            <program>hdiutil</program>
            <programArguments>create -srcfolder "${tempDir}/output" -volname "${project.fullName}" -fs HFS+ -fsargs "-c c=64,a=16,e=16" -format UDRW "${tempDmgFile}"</programArguments>
        </runProgram>
        <actionGroup>
            <actionList>
              <runProgram>
                 <program>hdiutil</program>
                 <programArguments>attach "${tempDmgFile}" -mountpoint "${tempDir}/mnt"</programArguments>
              </runProgram>
              <runProgram>
                 <program>SetFile</program>
                 <programArguments>-a C "${tempDir}/mnt"</programArguments>
              </runProgram>
              <runProgram>
                 <program>hdiutil</program>
                 <programArguments>detach "${tempDir}/mnt"</programArguments>
              </runProgram>
            </actionList>
            <ruleList>
                 <fileExists path="${build_project_directory}/images/dmg-icon.png"/>
            </ruleList>
        </actionGroup>
        <runProgram>
            <program>hdiutil</program>
            <programArguments>convert "${tempDmgFile}" -format UDZO -imagekey zlib-level=9 -o "${dmgName}"</programArguments>
        </runProgram>
        <deleteFile>
            <path>${tempDir}</path>
        </deleteFile>
   </postBuildActionList>
   ...
</project>
The new volume should now display your custom icon:
Creating fancy DMG
The DMG created in the previous section just included a custom volumen icon but it can be customized much further, like changing the background, the position of the icons and the size of the window. To do that, you must use AppleScript so you must have enabled the "Enable access for assistive devices" setting. You must also have access to the window server (command line builds using non-logged in users will fail). The below code uses some command-line configurable settings to create a customized DMG with a custom background (dmg-background.png in the images directory):
<project>
<shortName>sample</shortName>
<fullName>Sample Project</fullName>
<version>1.0</version>
...
<postBuildActionList>
<createTimeStamp>
<format>%Y%m%d%H%M%S</format>
<variable>timestamp</variable>
</createTimeStamp>
<setInstallerVariable>
<name>tempDir</name>
<value>/tmp/.tmpDir${timestamp}</value>
</setInstallerVariable>
<setInstallerVariable>
<name>dmgName</name>
<value>${installbuilder_install_root}/output/${project.installerFilename}.dmg</value>
</setInstallerVariable>
<setInstallerVariable>
<name>tempDmgFile</name>
<value>${tempDir}/tmp.dmg</value>
</setInstallerVariable>
<deleteFile>
<path>${installbuilder_install_root}/output/${project.installerFilename}.dmg</path>
</deleteFile>
<deleteFile>
<path>${tempDir}</path>
</deleteFile>
<createDirectory>
<path>${tempDir}/output</path>
</createDirectory>
<createDirectory>
<path>${tempDir}/mnt</path>
</createDirectory>
<copyFile>
<destination>${tempDir}/output</destination>
<origin>${installbuilder_install_root}/output/${project.installerFilename}</origin>
</copyFile>
<actionGroup>
<actionList>
<copyFile>
<destination>${tempDir}/output/.VolumeIcon.icns</destination>
<origin>${build_project_directory}/images/dmg-icon.icns</origin>
</copyFile>
<runProgram>
<program>SetFile</program>
<programArguments>-c icnC "${tempDir}/output/.VolumeIcon.icns"</programArguments>
</runProgram>
</actionList>
<ruleList>
<fileExists path="${build_project_directory}/images/dmg-icon.icns"/>
</ruleList>
</actionGroup>
<actionGroup>
<actionList>
<createDirectory>
<path>${tempDir}/output/.background</path>
</createDirectory>
<copyFile>
<destination>${tempDir}/output/.background/background.png</destination>
<origin>${build_project_directory}/images/dmg-background.png</origin>
</copyFile>
</actionList>
<ruleList>
<fileExists path="${build_project_directory}/images/dmg-background.png"/>
</ruleList>
</actionGroup>
<runProgram>
<program>hdiutil</program>
<programArguments>create -srcfolder "${tempDir}/output" -volname "${project.fullName}" -fs HFS+ -fsargs "-c c=64,a=16,e=16" -format UDRW "${tempDmgFile}"</programArguments>
</runProgram>
<actionGroup>
<actionList>
<runProgram>
<program>hdiutil</program>
<programArguments>attach "${tempDmgFile}" -mountpoint "${tempDir}/mnt"</programArguments>
</runProgram>
<runProgram>
<program>SetFile</program>
<programArguments>-a C "${tempDir}/mnt"</programArguments>
</runProgram>
<runProgram>
<program>hdiutil</program>
<programArguments>detach "${tempDir}/mnt"</programArguments>
</runProgram>
</actionList>
<ruleList>
<fileExists path="${build_project_directory}/images/dmg-icon.icns"/>
</ruleList>
</actionGroup>
<actionGroup>
<actionList>
<runProgram>
<abortOnError>0</abortOnError>
<program>hdiutil</program>
<programArguments>detach "/Volumes/${project.fullName}"</programArguments>
<showMessageOnError>0</showMessageOnError>
</runProgram>
<runProgram>
<program>hdiutil</program>
<programArguments>attach -readwrite -noverify -noautoopen "${tempDmgFile}"</programArguments>
</runProgram>
<runProgram>
<program>osascript</program>
<programArguments>-e 'tell application "Finder"
tell disk "${project.fullName}"
open
set current view of container window to icon view
set toolbar visible of container window to false
set statusbar visible of container window to false
set the bounds of container window to {${dmg_window_bounds}}
set theViewOptions to the icon view options of container window
set arrangement of theViewOptions to not arranged
set icon size of theViewOptions to ${dmg_icon_size}
set background picture of theViewOptions to file ".background:background.png"
delay 5
update without registering applications
set position of item "${project.installerFilename}" of container window to {${dmg_icon_position}}
update without registering applications
delay 5
end tell
end tell'
</programArguments>
</runProgram>
<runProgram>
<program>hdiutil</program>
<programArguments>detach "/Volumes/${project.fullName}"</programArguments>
</runProgram>
</actionList>
<ruleList>
<fileExists path="${build_project_directory}/images/dmg-background.png"/>
</ruleList>
</actionGroup>
<runProgram>
<program>hdiutil</program>
<programArguments>convert "${tempDmgFile}" -format UDZO -imagekey zlib-level=9 -o "${dmgName}"</programArguments>
</runProgram>
<deleteFile>
<path>${tempDir}</path>
</deleteFile>
</postBuildActionList>
...
<parameterList>
<stringParameter name="dmg_icon_position" value="300, 100" ask="0"/>
<stringParameter name="dmg_window_bounds" value="400, 100, 885, 430" ask="0"/>
<stringParameter name="dmg_icon_size" value="72" ask="0"/>
</parameterList>
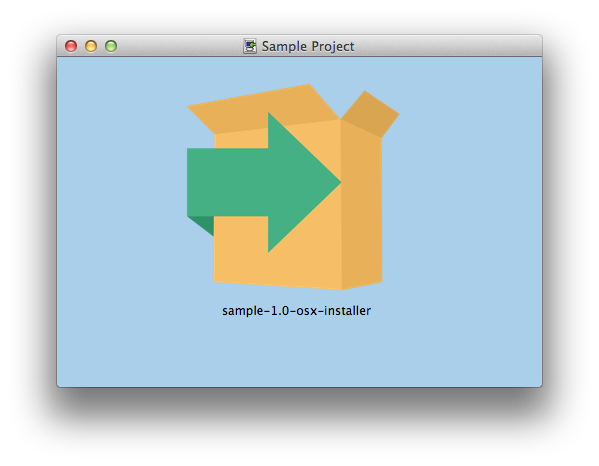
</project>Figure 77 shows an example with a customized background, the application centered and an increased icon size
Adding support for legacy OS X versions
Versions previous to InstallBuilder included by default support for PowerPC versions of Mac OS X.
For InstallBuilder versions 9 and later you need to explicitly enable support for those platforms by setting <osxPlatforms> to include the required platforms.
The value for the <osxPlatforms> tag should contain one or more of the following values:
-
osx-intel— include support for Intel based processors -
osx-ppc— include support for PowerPC based processors -
osx-10.2— include support that supports Mac OS X 10.2 for PowerPC based processors
To revert to behavior in previous versions of InstallBuilder and include support for all of the platforms, the project should have the following setting:
<project>
    <osxPlatforms>osx-intel osx-ppc osx-10.2</osxPlatforms>
    ...
</project>
In order to provide Intel and PowerPC support, but without the Mac OS X 10.2 compatibility, the setting should include both osx-intel and osx-ppc - such as:
<project>
    <osxPlatforms>osx-intel osx-ppc</osxPlatforms>
    ...
</project>
Creating 64bit installers
Apple is starting to move towards 64bit only applications and in macOS 10.13.4 is displaying a one-time alert when running 32bit applications (https://support.apple.com/en-us/HT208436). While the final transition dates to 64bit-only macOS are not yet established, InstallBuilder 18.4.0 already support them.
This new 64bit target will become the default in future releases of InstallBuilder but it is currently not enabled by default. If you want to start testing the new 64bit runtime, you just have to add it to the <osxPlatforms> tag:
<project>
    ...
    <osxPlatforms>osx-intel osx-x86_64</osxPlatforms>
    ...
</project>
Please note it is recommended to keep adding osx-intel to the <osxPlatforms> as the new osx-x86_64 only supports OS X >=10.6 (it won’t work on OS X 10.5) and this will provide a fallback to the standard 32bit runtime.
Creating ARM installers (Apple silicon)
Recent versions of Apple machines include an ARM processor (Apple silicon). While Intel binaries will still work through emulation (osx-x86_64 runtime), it is also possible to instruct InstallBuilder to include an ARM runtime. To do so, you only need to add it (osx-arm64) to the <osxPlatforms> tag:
<project>
    ...
    <osxPlatforms>osx-x86_64 osx-arm64</osxPlatforms>
    ...
</project>
The new osx-arm64 will only be used when running on ARM hardware, and will take precedence over osx-x86_64. If you do not provide it, osx-x86_64 will be always used.